
Using Zapier to build Qwilr Pages
Our Zapier integration lets you connect Qwilr with other apps, and generate personalized Qwilr Pages automatically. Zapier offers both free and paid plans.
Note: If you haven't used the Zapier integration before, please see our general Zapier article for more on how it works.
In this article:
Before you start
Zapier offers a wide selection of apps you can use as the trigger point for your Zap - forms, spreadsheets, and CRM tools, to name a few. Each app will have slightly different information it can pass into Zapier, so there may be some variation from these basic instructions. If you need any help, please reach out to our team.
In this example, we'll create a Zap that begins when a client enters responses in a Typeform. From there, Zapier will use the details from the form to create a new Qwilr Page.
Before you build the Zap, you'll want to have:
- A template ready in Qwilr
- A test form ready in Typeform
Note: Zapier allows sharing of Zaps, so here's a link to the one we've created in this article. You can open it in your Zapier account as a starting point.
Setting up the Qwilr Template
Step 1. First, build a Qwilr Page.
Step 2. Convert the page to a Qwilr template. In the top right corner of the page, click on the Create template icon.

Note: In Qwilr, your template will move from your dashboard to your template library. If you need to find it again, click the Create New button on your dashboard, and then choose From Template.
Step 3. Add some Variables to the page. Variables indicate where the personalized details will go. You can add as many Variables as you need. You'll define what the Variables are, but they'll be based on the information fields you're pulling in from the trigger app. In our example, we're basing the Variables on the fields in our form.
You can find instructions for creating Variables in this article. Here's an example from our Qwilr template, which has several Variables added.

Trigger: New form response
Note: If you're using an app other than Typeform as the trigger for your Zap, the process will be similar to what's shown here, but there may be small variations. Please reach out to our team if you have any questions about your own Zap.
Step 1. In Zapier, start a new Zap and choose Typeform as the trigger app. Then choose New Entry as the trigger.
Step 2. Click Continue, and then follow the prompts to connect your Qwilr and Typeform accounts.

Step 3. Once your accounts are connected, you'll be able to click on the Form field and choose the Typeform you want to use from the list. Then click Continue.

Step 4. Click Test Trigger. Zapier will search for the most recent response to this form in your Typeform account, and pull in that sample data. If your form doesn't have any responses yet, Zapier will pull in some placeholder data instead.

Step 5. Zapier displays the sample data like the example below.

The top section displays your form's questions (preceded by ###), followed by the sample responses.
Step 6. Click Continue with selected record to move on to the action step.
Action: Create a Qwilr Page
Step 1. Choose Qwilr as the action step for your Zap. Then choose the action Create Project. Click Continue.

Step 2. Follow the prompts to connect your Qwilr account to Zapier.
Step 3. Click on the Qwilr Template field. Zapier will display a list of your existing templates in Qwilr. Choose the one you want to use for this Zap.

Step 5. It's a good idea to have your template open in another browser tab for this step. Now it's time to give Zapier instructions about the Variables in your template.
We'll connect each Variable to a specific field in the trigger app. In this example, we'll use fields from the Typeform.
Start by typing the first Variable from your template into the Variables field.

How do I find the name of the Variable?
Open the Variables tab in your Template and tap on the three dots next to the Variable. Click Copy API reference. Now you have the Variable name copied to the clipboard, and you can paste it into the Variables field.

Step 6. In the field next to the Variable text, you'll choose the field from your Typeform that matches. In this case, our Variable is bride_first_name, so we'll choose the first name field from our Typeform.
Click on the field to bring up a list of all the available data fields from Typeform. Click Show All Options to expand the list. Then click on the field you want to match to your Variable.

Note: Remember, Zapier will display the sample data from your form next to each Variable. That makes it easy to choose the right one.
Step 7. Click the +Add value set symbol to add another variable.

Then repeat the process - type or paste the Variable text from your Qwilr template in the left field, and then choose the Typeform field to match it. You'll need to do this for each Variable you've used in your template.
Step 8. Click Continue. Then click Test. Zapier will create a test page in your Qwilr account.
If the test is successful, Zapier will reveal the Publish Zap button. Click it to make the Zap live.

If there's an issue and Zapier can't send a test email, it will present a troubleshooting guide. If you have questions, please reach out to us and we'll be glad to help.
Step 9. When you have a successful test, go to your Qwilr dashboard. You should see your template on the Pages dashboard now.
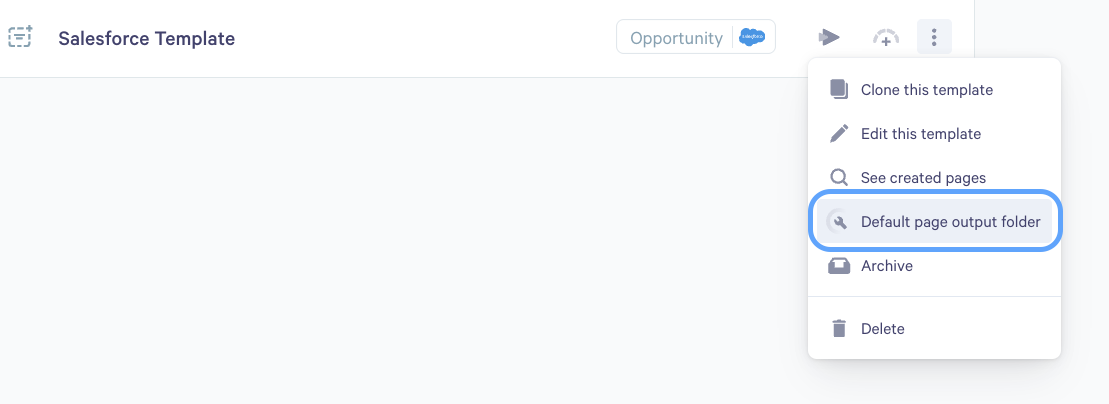
For any template, you can also choose a default page output folder by selecting More actions (the three dots). Whenever you create a new page, it will automatically appear in the selected output folder.
If there is no default output folder for a template, all pages created from this template will be saved in the Pages folder.
From this point, each time someone submits their responses on your Typeform, Zapier will create a new personalized page in Qwilr. You can then share it with the prospect.
Our team is here for you. Get in touch at help@qwilr.com if you have any questions.