
Qwilr Automations
Qwilr's internal Automations make it easier to keep your dashboard organized. Instead of tagging pages by hand or dragging them into the right folder after every send, you can set up rules that do it for you automatically based on what's happening with your pages. Whether a page has just been sent, viewed, accepted, or declined, Qwilr can apply the right tag and move the page to the right folder the moment that event occurs..
Each automation you create is built from two parts:
- When - the trigger event on your Qwilr page
- Do this - the action Qwilr takes in response
In this article:
- Setting up Automations for Managing Pages in Folders
- How Folder Automations interact with other Qwilr Settings
- Setting up Automations for Tagging Pages
- Full List of Triggers
- Add Action and Page is Created By
- Activity Log
- Frequently Asked Questions
Note: Qwilr Automations are available for Starter, Growth, and Scale plans (as well as any other legacy plans that were specifically paying for API access).
Setting up Automations for Managing Pages in Folders
- In your Qwilr dashboard, click Automations in the left sidebar.
- Click Create Automation in the top right corner.

- Select Qwilr under Workspaces in the Apps dropdown list.
- Give your automation a clear name and optional description so your team knows what it does.
- In the When section open the dropdown and choose the page event you want to use as the trigger. Some available triggers include:
- A page is sent
- A page is first viewed
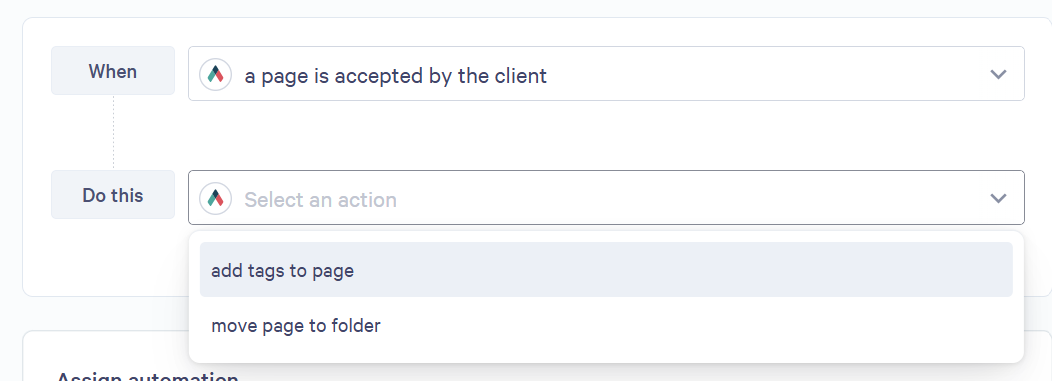
- A page is accepted by the client
- A page is declined by the client
- A page expires
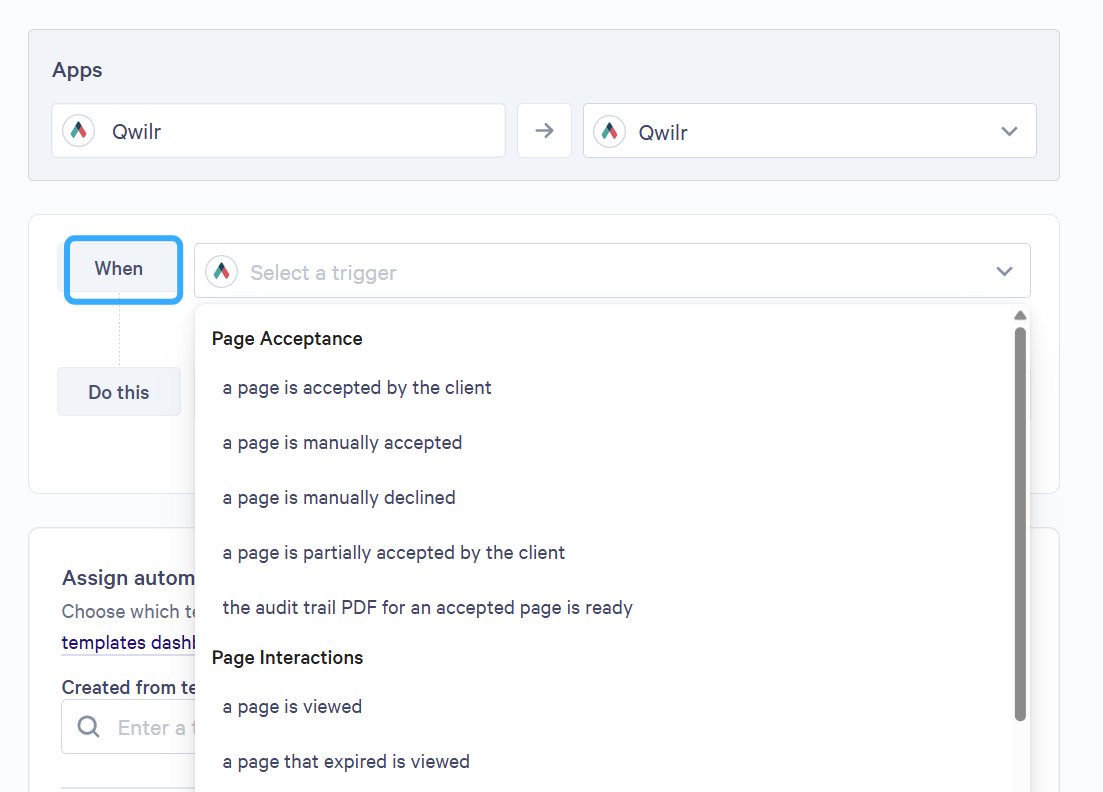
- In the Do this section select Move to folder
- This will move a page to the folder specified based on the trigger, or When, occurring.
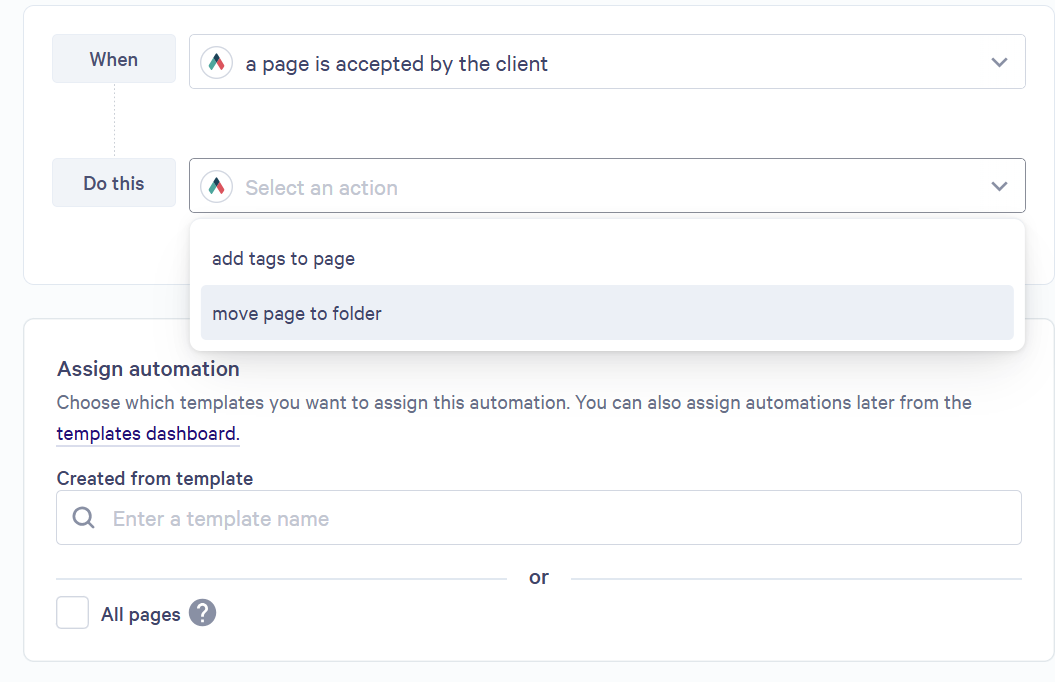
- You will then be allowed to Choose a folder and pick from your folder list or click New folder to add a new folder directly from inside the Automation. This folder will then appear in your Qwilr dashboard.
Note: You can use the + symbol to stack multiple actions on the same automation. For now, well keep this simple.
- Under Assign automation, select which templates this automation should apply to. You can choose one or more templates, or select All pages to run the automation across every page in your account regardless of template.
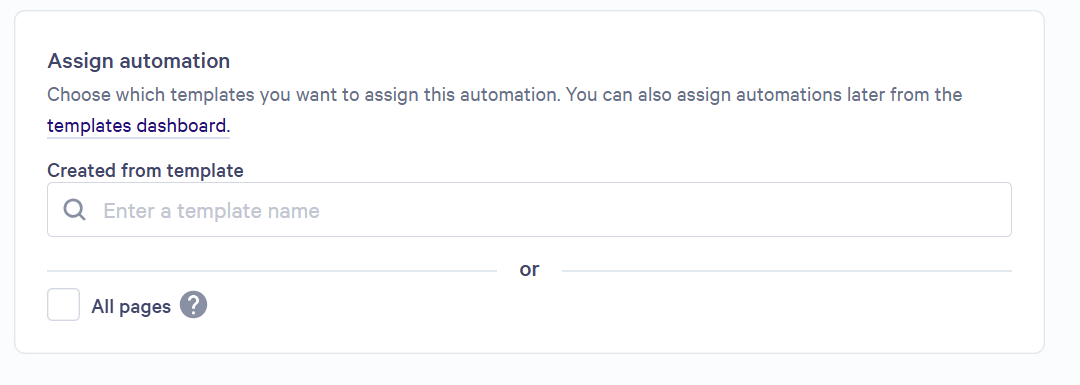
- Then click Create in the top right of the page to save the Automation and make sure the Automation is toggled on.
Folders Automations and Interactions with Permissions and Default Folder on Templates
There are two key aspects to how moving a page with an automation may interact with either the default folder that a Template is already set to create pages in or who has permissions to view a page within a folder.
The default folder set for a Template vs. an Automation to move pages to a folder that includes that template.
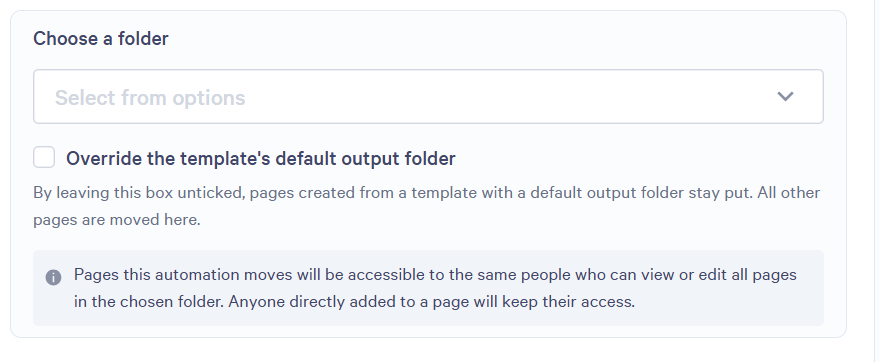
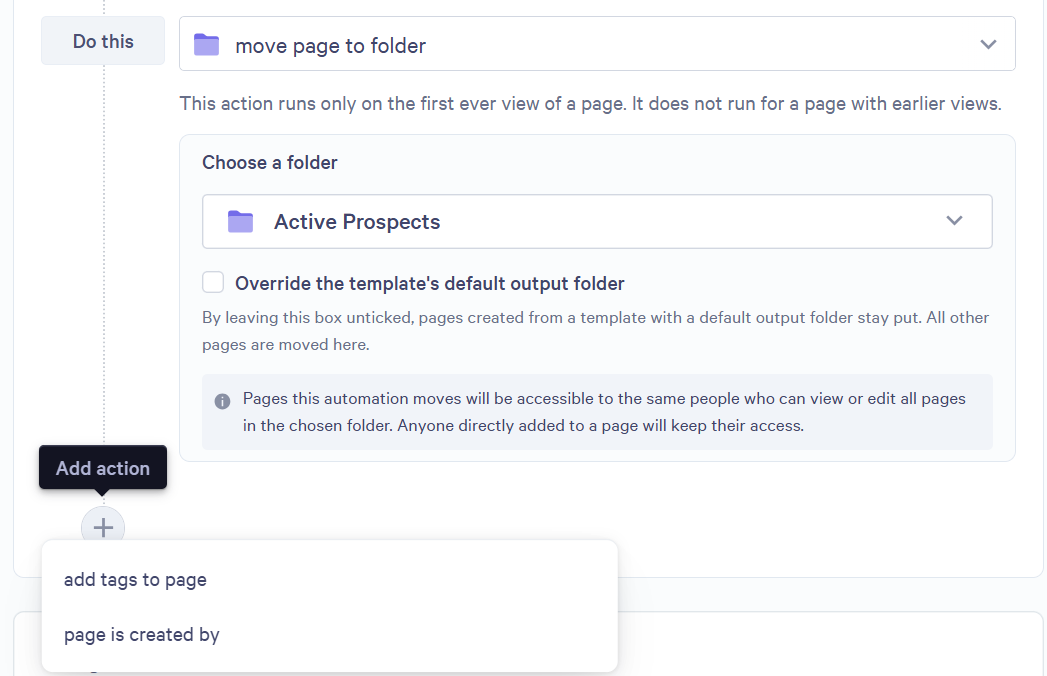
- You can check a box to Override the template's default output folder or leave it unchecked.
Pages moved to a folder via Automation will inherit the Permissions of the folder they are in after the automation is complete.
- Permissions for viewing pages that are set at the folder level will apply to the page. Meaning, anyone who is permitted to view or edit pages within a folder permission setting will be granted the same access to the page once moved. Anyone individually granted access on the page level will maintain that access even if they don't have permission to see pages in that folder.
How to set up an Automatic Tagging automation
- In your Qwilr dashboard, click Automations in the left sidebar.
- Click Create Automation.
- Select Qwilr under Workspace in the Apps dropdown list.
- In the When section, choose the page event that should trigger the tag. Some available triggers are:
- A page is first viewed
- A page is accepted by the client
- A page is declined by the client
- A page expires
- In the Do this section, select Add tag to page.
- Choose an existing tag from the dropdown, or type a new tag name to create one on the spot. You can add/select multiple tags to the same automation under the Tags to add menu.
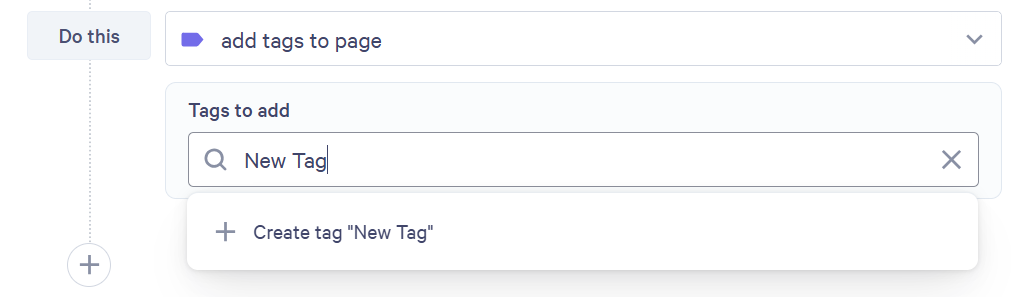
- Tags have a 30 character limit per tag.
- 3 tags are unavailable (reserved for internal Qwilr use): archive, starred, templateqwilr.
- Under Assign automation, select the templates this automation should run on. You can assign it to one template or several and it will apply to every page created from those templates going forward. You can also apply it to All pages on the account.
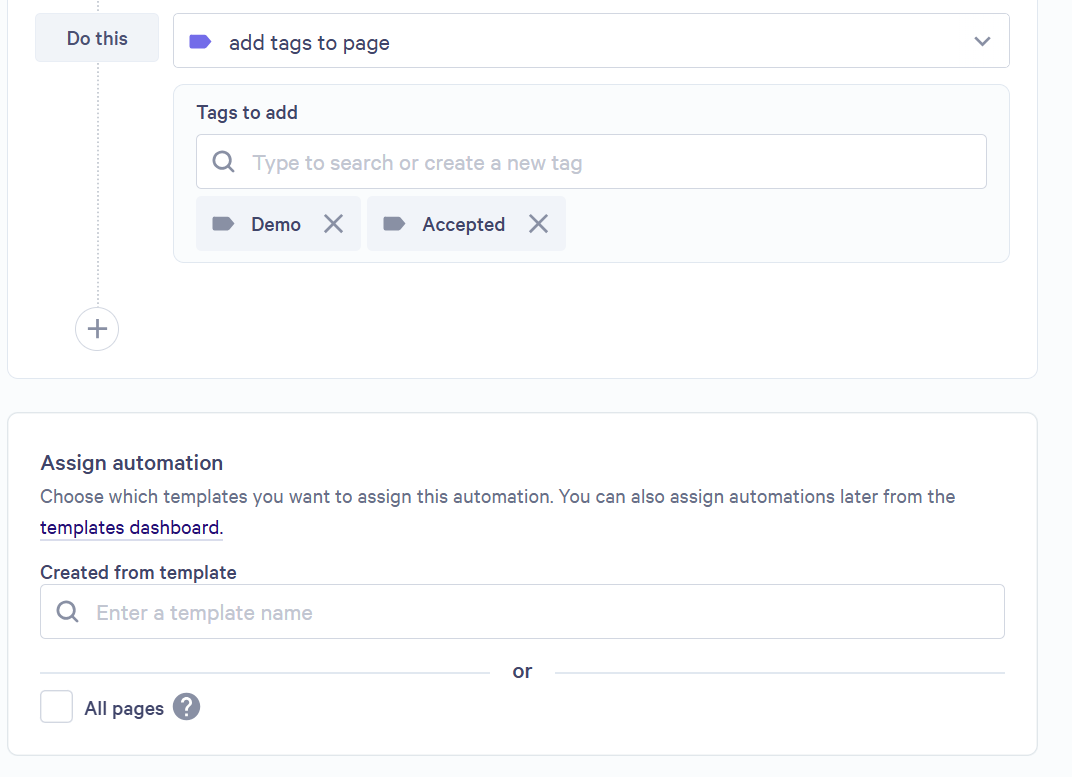
- Click Create to save the Automation.
Note: Automations only run on pages created after the automation is saved and assigned. Existing pages will not be retroactively tagged.
Full List of Triggers for Moving Pages and Adding Tags
Below is a full list of Triggers for When an event occurs. These can all be used to trigger either moving a page to a folder or adding tags, or both!
| Page acceptance |
| a page is accepted by the client |
| a page is partially accepted by the client |
| a page is manually accepted |
| a page is manually declined |
| the audit trail PDF for an accepted page is ready |
| Page lifecycle |
| a page is created |
| a page is set to live |
| a page is set to draft (from live) |
| a page is set to live (from declined) |
| a page is set to draft (from declined) |
| a page is expired |
| a page is archived |
| Page interactions |
| a page is viewed first view only |
| a page that was declined is viewed |
| a page that expired is viewed |
| a person interacts with pricing on the page |
| a person started accepting the page but has not completed it |
| a page's viewer is identified (with Identity Verification feature only) |
Add Additional Actions on a Single Automation
An Automation can have both the move page to folder action and the add tags action applied to the same one. When you click the + button under the Do this in an Automation, you will be given the option.
Page is Created by
Page is created by is an additional action you can add that creates a filter. After selecting the Add action and then page is created by you will see a second When filter. This will allow you to Select a member of your team if you want certain pages created by certain people to go to different folders or have different tags. You can have multiple team members included in the single When filter.
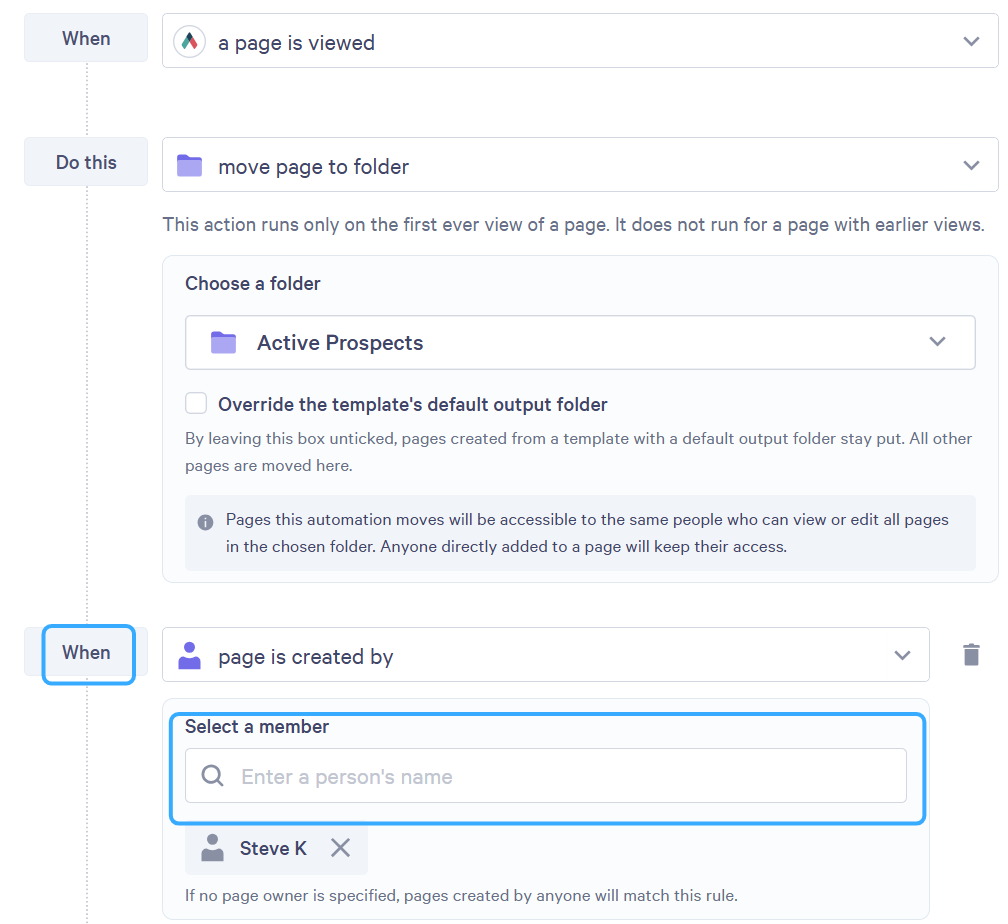
- This can only be applied after the first Do this is selected.
- If a team member is removed from the account, their name will appear in the list in a red box.
Activity Log
Being able to verify if your automations are working is important. If an Automation is not working you can review this section of Automations in your account to discover details on what went wrong.
- Start by going to Automations on the left-hand side of your Qwilr Account.
- Toward the top you'll have three tabs; Your library, Recommended automations, and Activity log. Click on that Activity log tab.

- In this window you find the following:
- Automation name: The name of the Automation that ran.
- App: The logo of the application the Automation works with. In this case, Qwilr's logo.
- Page name: The name of the page that should have triggered the Automation.
- Template name: The name of the Template the Automation is assigned to.
- Date: The date and time of the automation.
- Status: Whether the Automation was a Success or Failed.
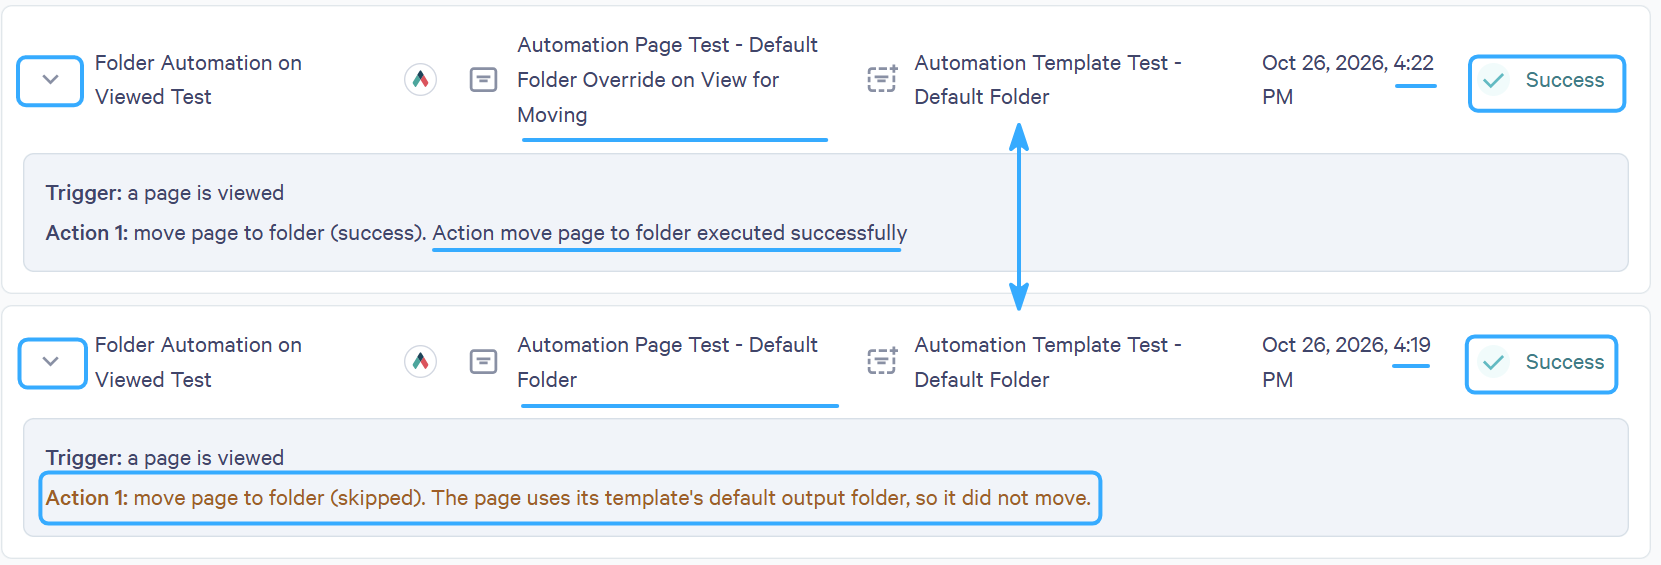
Note: Automations that are Skipped are listed as a Success in the log but the details on the reasoning for the skip are in the expanded details of that row on the Activity log.
- In the image below we can see two logs of an Automation with the details expanded; arrow on the left. We can see that they are both Trigger on a page is viewed and that, while both of them have different Page names, the Template name is the same. They are 3 minutes apart and both listed as a Success. However, on inspection of the details we can see the one done at 4:19 PM was skipped due to the page uses it's template's default output folder, so it did not move. Then, after adjusting by clicking the Override the template's default output folder in the Folder Automation on Viewed Test automation, viewing another page from this same Template worked properly.
- When scrolling down to the bottom of your Activity log, you will be able to see a button to Load more activities, going further and further back from today's calendar date.
Some Activity log reasons for Skipped and Failed Automations are below:
| Shown as | Message |
|---|---|
| Success, action skipped | This page has been viewed before, so the page did not move. |
| Success, action skipped | This page has been viewed before, so the automation added no tags. |
| Success, action skipped | The page uses its template's default output folder, so it did not move. |
| Failed | The destination folder does not exist |
| Failed | The page is archived, so the automation cannot move it. |
| Failed | The page is a template, so the automation cannot move it. |
| Failed | The page was deleted before the move. |
| Failed | The page was deleted before the automation added the tags. |
| Failed | The Qwilr Automations API key does not work. Contact Qwilr support. |
| Failed | This account has no working Qwilr connection. Contact Qwilr support. |
FAQ
I turned an automation on, but my pages aren't being tagged or moved. What should I check?
Double-check the following:
- Confirm the automation is toggled On in your Automations library.
- Check that the automation has been assigned to the correct template. Automations only run on templates they've been explicitly assigned to.
- Make sure the page was created from that template after the automation was enabled.
-
Open the Activity Log and look for any error entries next to the automation run in question.
If everything looks correct but the automation still isn't firing, please reach out to help@qwilr.com.
What happens to a page's folder if I edit or delete the automation that moved it there?
Editing or deleting an automation does not move or remove pages that were already placed by a previous run. The page stays wherever it was last moved to. Only future page-creation events are affected by the updated (or removed) automation.
Can I use automatic folder management to move pages into a subfolder?
Yes. Any folder visible in your Pages dashboard, including subfolders, can be the target location for a move page to folder automation.
It won't let me save a new automation. Why?
This can be two things typically. The first is that you have not titled your automation and the Create button is grayed out. The second is that another automation that would directly conflict with the one you are creating is already assigned to one or more of the templates you are trying to assign it to. If that is the case you will be told which automation already is providing that trigger and settings.
