
Upgrade to Salesforce V2 Guide
We've rebuilt Qwilr's Salesforce integration. This guide walks you through moving across from the previous one. You can go at your own pace. Your current setup keeps working the whole time, both integrations run side by side, and you upgrade your Templates one at a time — there's no cut-over moment where everything has to switch at once.
We will retire the legacy Salesforce integration on 28 February 2027. Both integrations run side by side until then, so you can move across at your own pace.
In this article:
- Before You Start
- Step 1: Install the New Package
- Step 2: Connect the New Integration
- Step 3: Upgrade Your Templates
- Step 4: Check Everything Works
- Bulk Creating Qwilr Pages in Salesforce V2
- Frequently Asked Questions
Before You Start
- In Qwilr, you need to be an Admin. The Upgrade button only appears for Admins.
- In Salesforce, you need a user who can install packages and edit page layouts: typically a System Administrator.
What you'll do
- Install the new Qwilr Proposals package and add its component to your Salesforce record pages.
- Connect the new integration.
- Upgrade your Templates.
- Point your Automations at the upgraded Templates.
- Check everything works.
Step 1: Install the New Package and Add the Component in Salesforce
The new integration is its own package, Qwilr Proposals. This is separate from the earlier Qwilr package, so the two install side by side and nothing about your existing setup changes. There's no in-Salesforce upgrade between them; you simply add the new one, and uninstall the old one whenever you're fully moved across.
Open the Qwilr Proposals install link and follow the prompts:
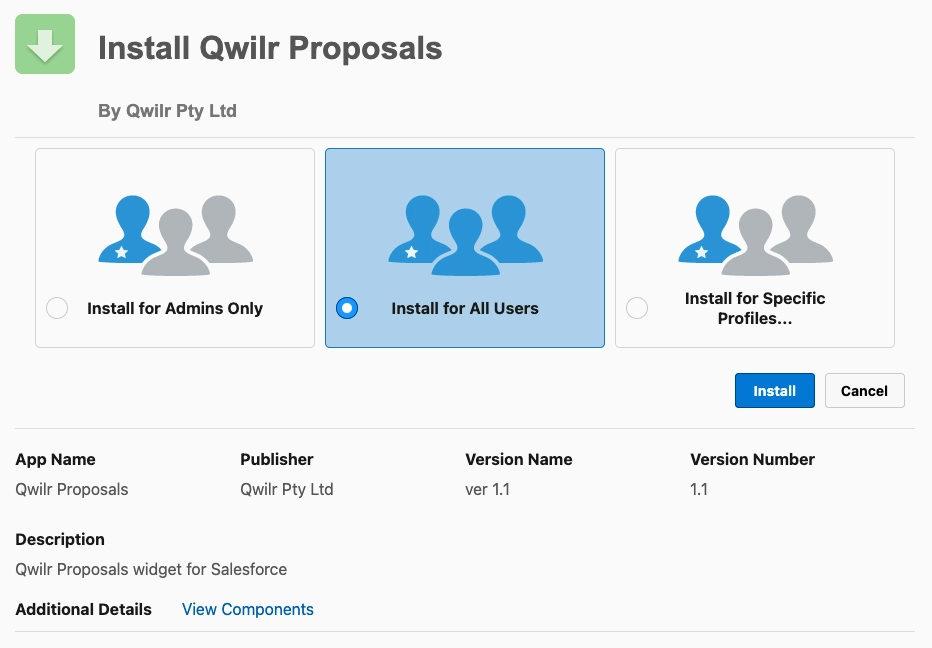
Make sure to install for All Users. The Application should notify you with an Installation Complete! message when it is done.
Installing it automatically assigns the Qwilr Proposals permission set to your active standard users, so all of your team can see the Qwilr component once it's added to a page layout.
If you add users later, or some team members can't see the component, assign them the Qwilr Proposals permission set in Salesforce Setup.
Adding the Component to your Record
The package includes the Qwilr Proposals component, which sits on your Opportunity, Account, Contact, and Lead records. This is so your users can create and track pages directly inside a Salesforce Record without having to navigate inside of Qwilr. Here's how to choose where it appears.
For Lightning
For this example, we'll be using an Opportunity record but the process is the same for all four Record types.
Step 1. Open an Opportunity Record you are looking to add the Qwilr Integration to and select the gear icon toward the top right, then select Edit Page.
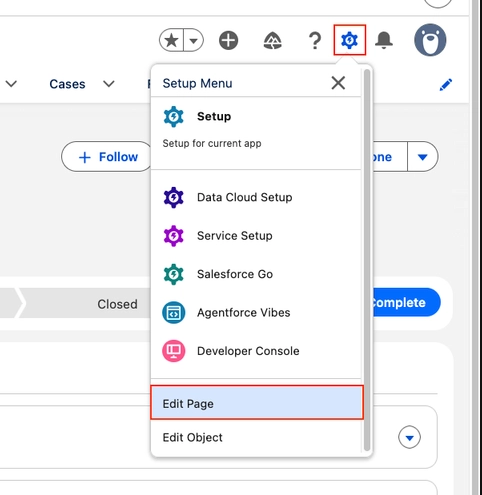
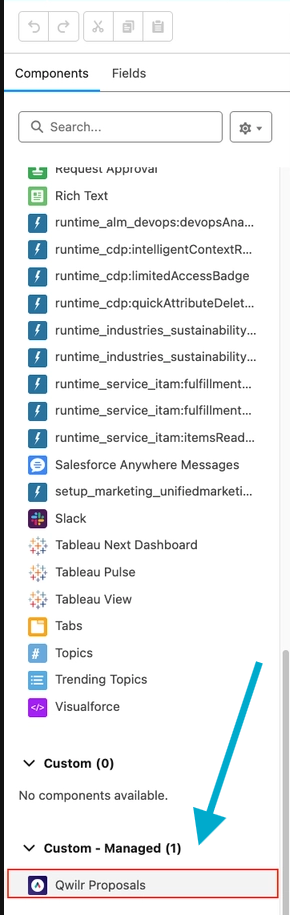
Step 2. In the Lightning App Builder, search the component list on the left for Qwilr Proposals, and drag it where you'd like it to appear. We think the right sidebar works well.
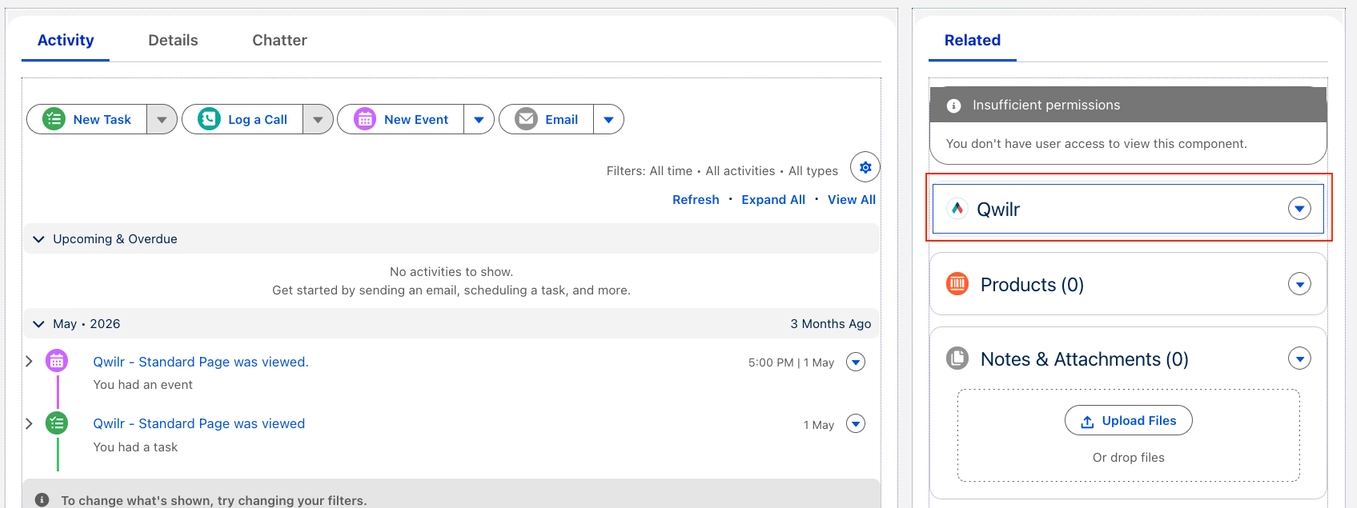
Note: If you see any messaging around Insufficient Permissions - you can ignore it until you have finalized the full integration setup. There are steps that will clear this message later in this help doc.
Step 3. Now Save and Activate the page (both buttons appear in the top right corner). If Activation appears greyed out, click Save first; Salesforce enables it after the first save.
You will go through several menus to progress through Activation.
- First, the Activation Opportunity Record Page where you select Assign as Org Default.
- Second, the Assign form factor page where you will select Desktop.
- Third, the Review assignment page to confirm and save.
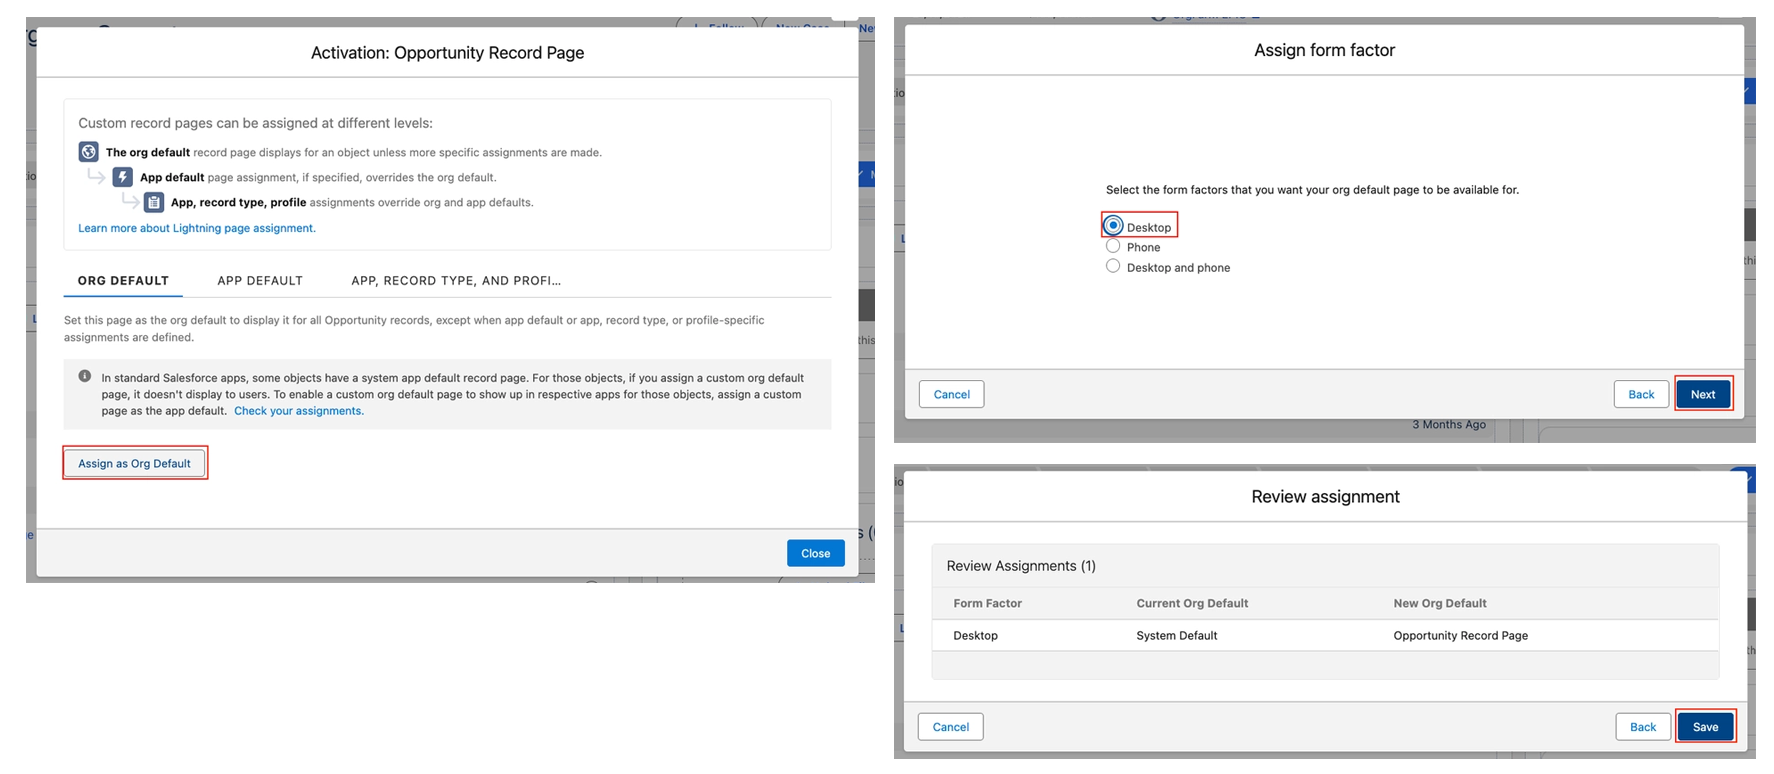
You can then head back to your Opportunity record and should now see the Qwilr widget in your right-column menu.
For Classic
In this example, we’ll show how to add Qwilr to the Contact layout. These same steps can also be applied to Account, Opportunity, and Lead pages.
Step 1. To get started, go to any Contact record. Click Edit Layout in the top right corner.

Step 2. In the Contact layout tab, select the Visualforce Pages option (you may need to scroll down to see it). From here, choose Section and drag it to the place you'd like it to appear on your Contact page.

Step 3. Name the Section "Qwilr" and select the 1-Column Layout. Then click OK. Then drag the Qwilr_Contact block from the Object Manager into your new section.
Step 4. From there, click the wrench icon in the top right corner of the new section. Change the height to 350 pixels and click Show Scrollbars.
Step 5. Click OK. Once that's done, you'll see the Qwilr widget in each Contact record.
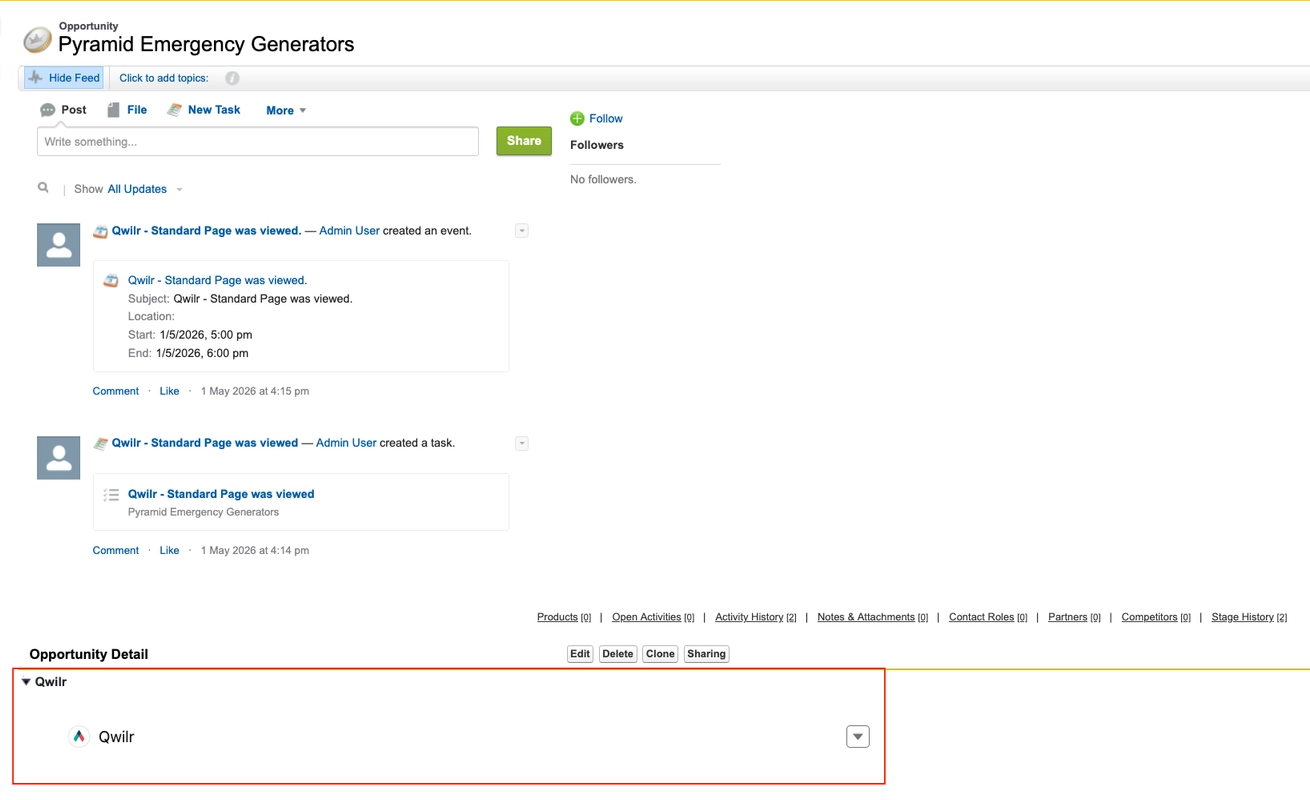
Note: After the new Integration is installed in Step 2 below, on your records you will have to Authorize the app. Your team members may each need to do this the first time but then should no longer be required to when they create new pages.
Step 2: Connect the New Integration
Go to Account Settings → Integrations in Qwilr, search for Salesforce, and select the tile marked New version; your existing tile is renamed Salesforce (old) and its logo turns grey, so you can tell them apart. Click Enable Salesforce and approve the connection in the pop-up, or Connect to sandbox to trial it against a sandbox first.


One environment at a time. The new integration connects to a single Salesforce environment; sandbox or production. If you trial against a sandbox, switching to production later breaks the sandbox connection.
Step 3: Upgrade Your Templates
Each Template is upgraded on its own, from inside the Template. There's no bulk conversion, and no rush to do them all at once. Templates you haven't upgraded yet keep working with the old integration.
The Upgrade button only appears when the new integration is connected to your production Salesforce org. A Template can only be upgraded onto the same Salesforce environment the old integration uses. If you've connected the new integration to a sandbox, the button won't appear on any Template.
Connected to a sandbox? That's a good way to try the new integration before you commit, and everything except the Template upgrade works as normal. Follow Salesforce V2: Installation Guide to build a Template against your sandbox, add variables to it, and create Pages from your sandbox records. When you're ready to move your real Templates across, reconnect the integration to your production org and the Upgrade button appears.
Where to find the button
Open a Template that's still linked to the old Salesforce integration. The Upgrade button the banner at the top of the Template editor.

Running the upgrade
We recommend you duplicate (clone) the template first.
There's no one-click undo for an upgrade. You can move a template back to the old integration by changing its connected integration, but you'd then need to reassign its variables by hand. Keeping a duplicate (by cloning) is the best safety net. You can try upgrading the cloned template and test it first before upgrading the original template.
- Open the Template.
- Click Upgrade. Qwilr reads the Template and works out what it can move.
- Review the summary. It lists the Variables that will be swapped and, if there are any, the Variables that can't be swapped. Expand either card to see them named as they appear in your Template.
- Click Upgrade to confirm.

When it finishes, you'll see a confirmation telling you how many Variables moved and how many were left behind.

What the upgrade moves
- Variables in your content: swapped for their equivalents in the new integration.
- Variables in the Page title: swapped as well, so Pages keep naming themselves after their record.
- Quote products (for Opportunity templates): line items driven by Salesforce data carry across, including their fields.
- The Template's link to Salesforce: moved to the new integration. The record type doesn't change: an Opportunity Template stays an Opportunity Template.
- For users of the Smart Proposal Engine and Conditional Content (Scale accounts only)
- Block logic: conditions built on Salesforce Variables are upgraded with the Template. Conditions built on anything else are left exactly as they are.
Variables that can't be upgraded
A few Variables may need attention by hand. The review screen names them before you commit, and the confirmation screen names them again afterwards:
- Fields that no longer exist in your Salesforce org: this is most common with variables typed by hand inside curly braces, where a small typo means the Variable never matched a real field. These often sit in Template titles, where they're easy to overlook.
- Fields belonging to a different object type: an Account variable in an Opportunity Template, for example.
These are left untouched in the Template rather than removed, so nothing disappears without you seeing it. Replace each one with its new equivalent from the variables panel, or delete it.
Quote products
Quote line items driven by Salesforce carry across with the Template, and so do the product variables inside them.
What the upgrade leaves alone
- Seller Form Variables are untouched. They aren't Salesforce Variables, so the upgrade doesn't affect them and Templates that use them upgrade normally.
- Account Variables are untouched for the same reason.
- Pages already created from the Template are not changed. See the questions below.
Step 4: Check Everything Works
In Salesforce, open the Qwilr Proposals component on a record and click Create new page. Your upgraded template(s) should appear in the list. Create a page and check the variables fill correctly.

You can also tell your templates apart in the Qwilr Template dashboard by the color (or lack there of) of the salesforce integration they're linked to. Templates linked to the new integration are in color and the ones linked to the legacy integration are in black and white.

Bulk Creating Qwilr Pages in Salesforce V2
If you've used the Salesforce bulk creation feature and want to keep using it with the new integration, there are a couple of quick steps you'll need to take first.
Step 1. In Salesforce, go to Setup, then Object Manager, and select Opportunity.
Step 2. Click List View Button Layout in the left menu. You'll see a single row called List View.
Step 3. Open the menu at the end of the List View row and click Edit.

Step 4. Under Custom Buttons, you'll see a second Create Qwilrs button in Available Buttons. Move this new one across to Selected Buttons, then move the old Create Qwilrs button from Selected Buttons back to Available Buttons. Click Save.

Frequently Asked Questions
Do I have to move everything at once?
No. Upgrade Templates one at a time, whenever it suits you. Both integrations run side by side, so nothing breaks while some Templates are still on the old one.
Why can’t I see the Upgrade button?
Check that you're in a Template rather than a Page, that you have Admin access, that you can edit that Template, and that the new integration is connected to your production Salesforce org rather than a sandbox.
The button says "Learn more" instead of "Upgrade".
That means the new Salesforce integration isn't connected on your account yet. Connect it first — see Step 2 — and the button becomes Upgrade.
Can I undo an upgrade?
There's no one-click undo. A Template can be moved back by changing the integration it's linked to, but its Variables would then need reassigning by hand. Clone a template, upgrade that and test it before upgrading the original template.
Do my quote products carry across?
Yes. Quote line items driven by Salesforce data are upgraded with the Template, along with the product variables inside them. If any product content can't be moved, the upgrade warns you before you commit and leaves that content in place.
Will I lose my pages previously created with the old integration?
No, all pages created with the old integration will also be shown in the new Qwilr component so there is no loss of records of Qwilr pages.
What happens to the Automations assigned to a Template?
They keep running. Check each automation in Library → Automations still has the Templates you expect assigned to it.
Do I need to re-authenticate?
The new integration is a separate connection: an Admin connects it once in Qwilr, and each team member authorizes the Qwilr Proposals component once. Your old connection stays as it is until you disable it.
When will the old integration stop working?
We will retire it on 28 February 2027. Until then both integrations run side by side, so you’ll have until then to move across.
When should I disable the old integration?
Once you've connected the new one and upgraded the Templates you need, you can disable the old integration in your account settings. Uninstall the old Salesforce package whenever you're fully moved across.
Any questions? Don't hesitate to contact us at help@qwilr.com