
Pricing Tables with Quote Widgets (Beta)
When you need to present your price quote as a straightforward list of line items, a Quote section works great!
Quote sections are part of Qwilr's Quote widgets. You can add them to any Text block on your page, right alongside your text, images, and other content. Populate them directly on the page or import line items from your CRM. You can recommend the best options as a seller, and even upsell buyers with add-ons while you're there.
Note: Quote sections replace the tables from the old Quote Block. Existing Quote Blocks are upgraded automatically when you open the page or template in the editor. Quote widgets can't be added to Accept blocks or Agreements.
In this article:
- Adding a Quote section
- Types of line items
- Adding and managing line items
- Customising column headings
- Saving a line item
- Adding a section title
- Choosing how buyers select items
- Styling your section
- Showing totals
- Managing your Quote sections
Adding a Quote section
You can stick with just Quote sections in your quote, or mix things up by adding Plan card sections.
To add a Quote section, go to any Text block and click the + widget adder. Then choose Quote section.


Want a head start? Open the + and select Quote, then pick a quote preset. Presets are ready-made Text blocks with Quote widgets already set up.


Each new Quote section comes with one line item by default.
Standard Quote Table

Plan Card Quote

Note: Quote sections can sit inside a Columns widget, but not inside an Accordion.
Types of line items
Qwilr supports four types of line items in a Quote section.
- Fixed Cost: an item that has one unit price
- Volume Cost: an item where the unit price changes depending on the quantity (previously called Variable)
- Text line item: a descriptive line with no pricing
- Saved line item: an item from your saved line item library

Adding and managing line items
Feel free to add as many items as you want in each section of your quote!
For each line item, enter a description, rate, and quantity. The price is calculated automatically from these inputs. Line item descriptions support rich text, so you can add headings, links, bold, italics, and more.

Note: If you have a large number of items to add to your quote, you might want to upload them in bulk.
Adding a line item
To add a line item at the bottom of a section, click the + icon below the section and choose a line item type. Then add a description and cost details.

You can also add an item between two existing line items. Hover over the left edge of the quote where you'd like the new item to go, then click the + icon and choose your line item type.

Editing a line item's settings
Click the pencil icon on a line item to open its menu. From here, you can edit its Properties and apply Discounts and Taxes to that line.

Move, duplicate, and delete a line item
-
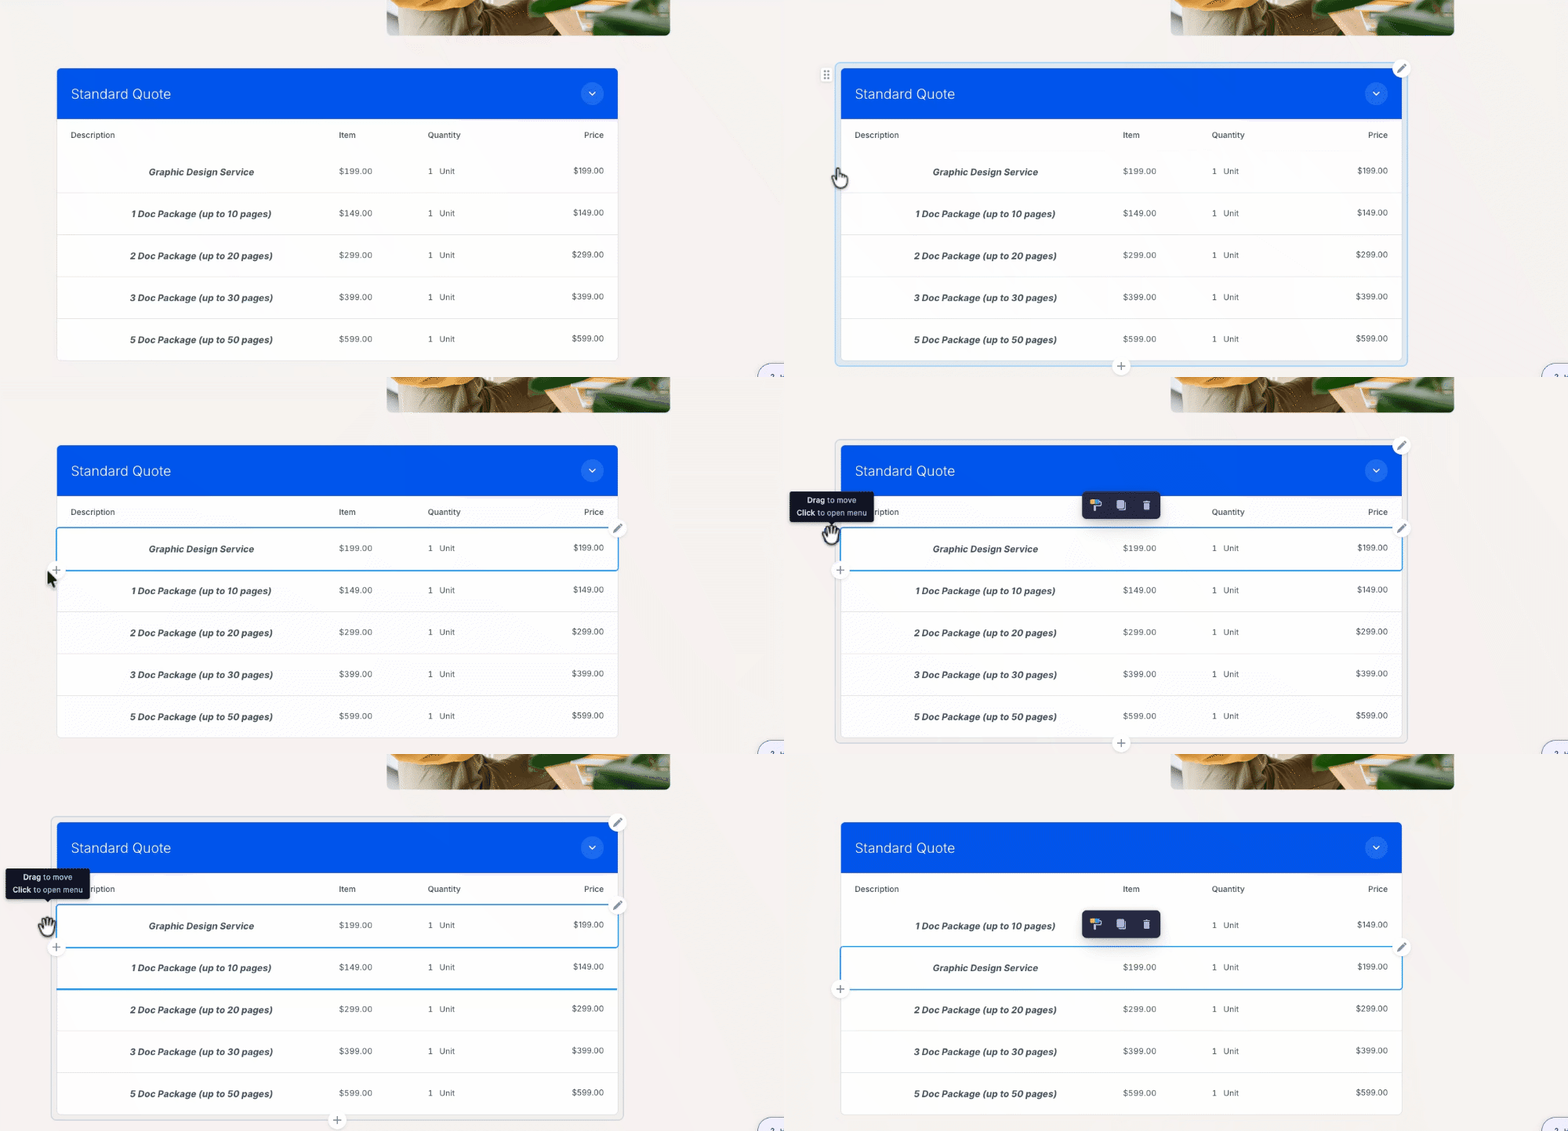
Move: hover over the left edge of the line item you want to move until the drag handle (⋮⋮) appears. Then click and drag the item to its new spot in the section.
-
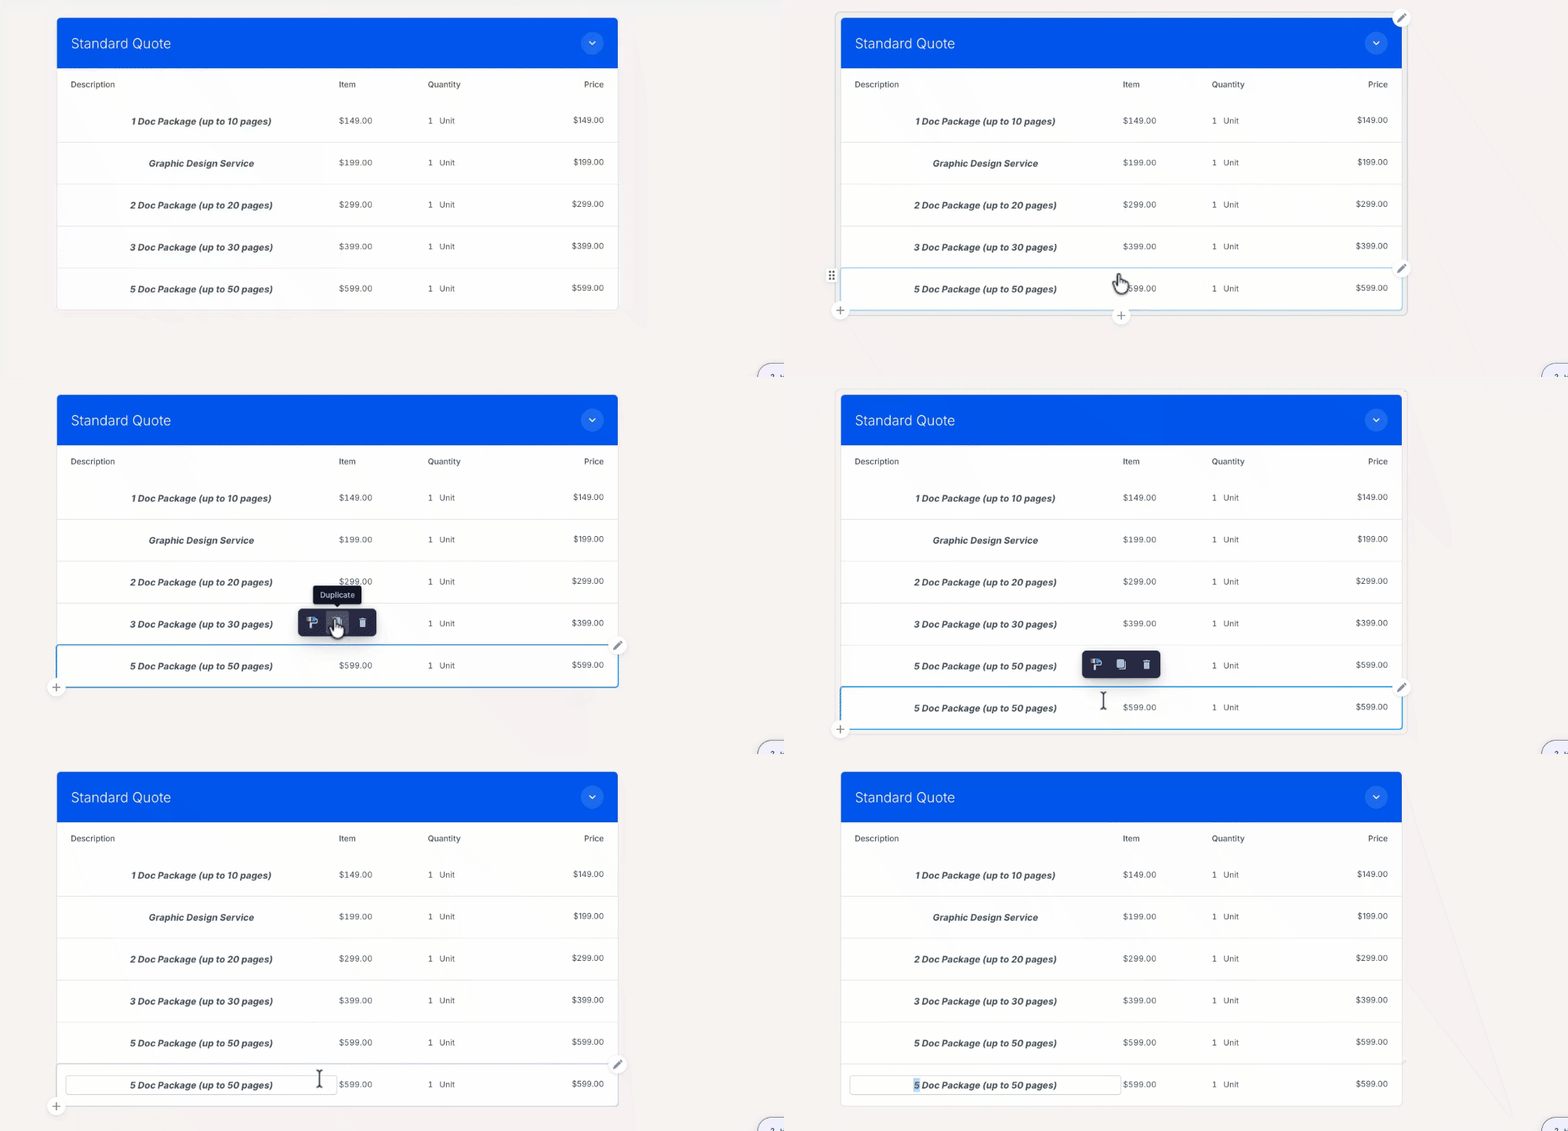
Duplicate: click the Duplicate icon, then edit the new line.
- Delete: choose Delete.

Setting up volume pricing
Volume pricing lets you set different prices per unit depending on the quantity. Once a threshold is reached, every unit is charged at that tier's price. There's no limit to the number of tiers.
-
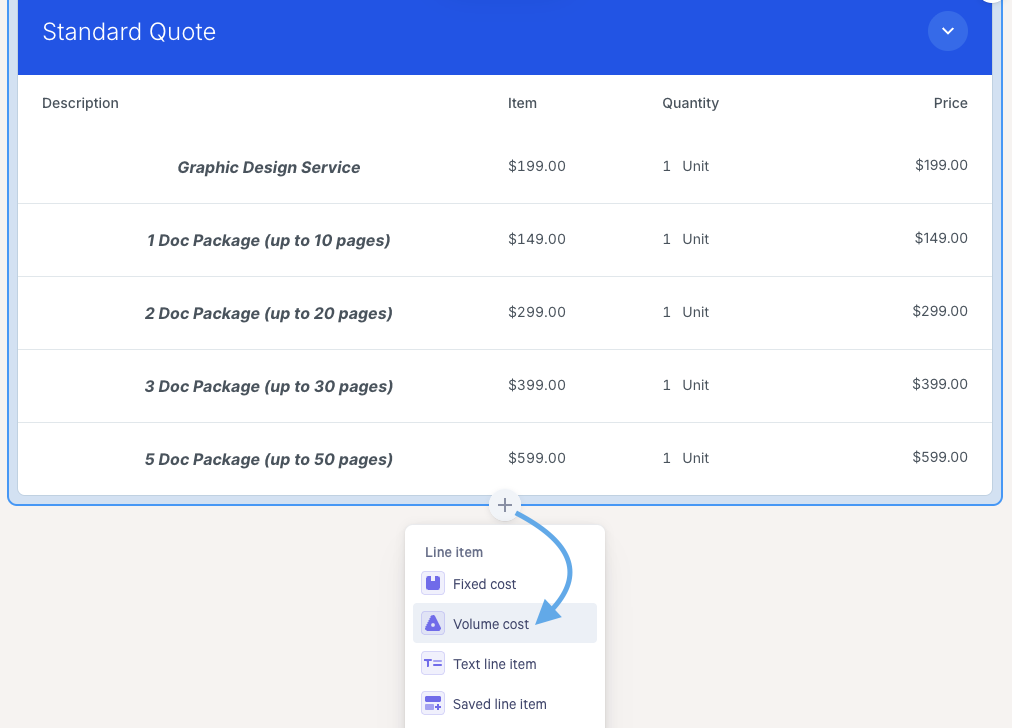
Add a Volume Cost item.
-
Click the item's rate amount, then choose Edit volume pricing.

- Update the tiers. For each one, choose whether it applies when the quantity is more than or is at least the threshold.

Customising column headings
You can rename columns to suit your quote. There are two ways to do it:
-
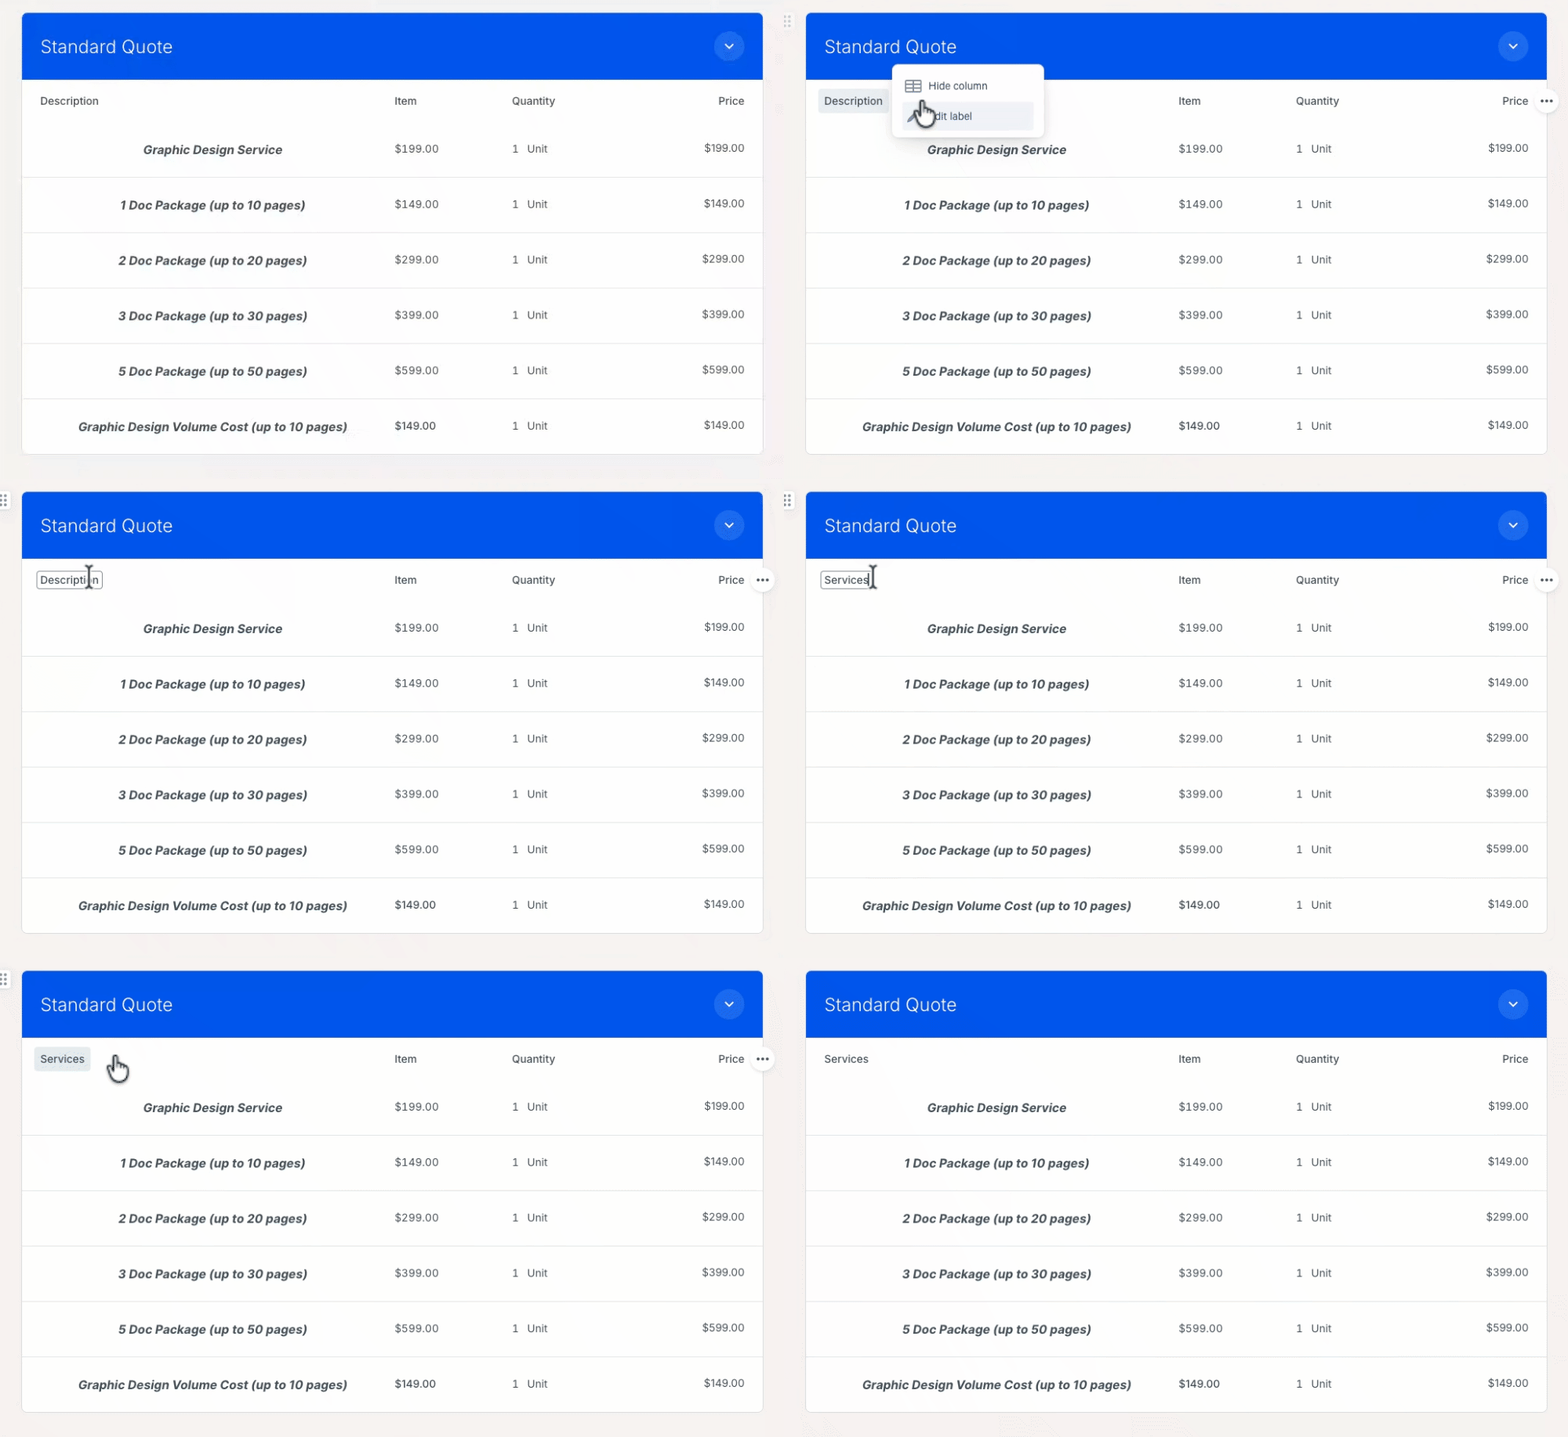
For every item in the section: click the column heading, then choose Edit label.
-
For specific items only: hover over the line item and click the pencil icon at the right end of the row. Choose Properties, click the property you want to rename, then update its Label and click the checkmark icon to save. The item gets its own heading row with your new label.
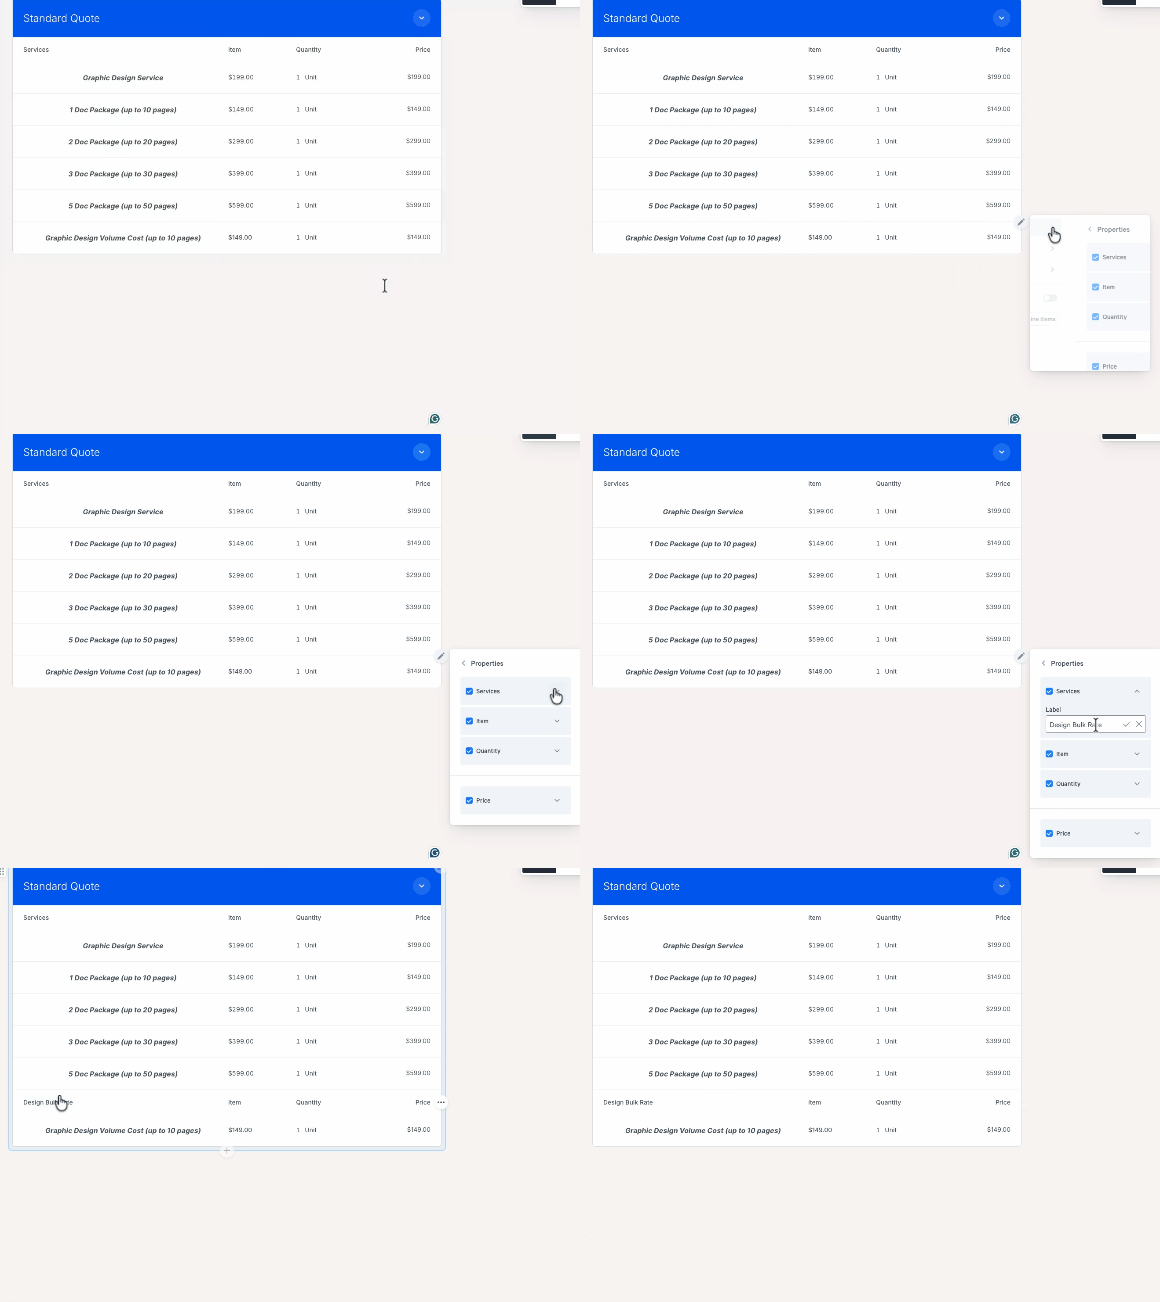
Note: Column headings can no longer be renamed through language overrides (label sets).
Saving a line item
If you plan to use a line item again, save it to your library. It will then be available to add to future quotes. To save a line item, hover over it and click the pencil icon at the right end of the row. Then choose Add to saved line items.

Note: Taxes and custom column names on a line item won't show in the saved line item library. Don't worry, they're still there. When you add the saved item to a page, it keeps its taxes and column names.
Adding a section title
In the header of each section, enter a name for the section. Highlight the text to bring up a toolbar for styling.

Choosing how buyers select items
Selection settings now live on each Quote section, so one quote can mix selection types. For example, a single-select section can sit alongside a multi-select one. Use these settings to match what you set up in the old Quote Block:
| Old Quote Block selection type | Quote section setting |
|---|---|
| One combined package | Leave the section required (Optional off) |
| Multiple choice | Optional on, Single select off |
| Single select | Optional on, Single select on |
To learn more, see Adding package options to quotes.
Styling your section
Each Quote section has its own styling, so a plain section can sit next to a colourful one. Click the paint roller menu on the section to style it.

Want the look of the old Quote Block's simple mode? Turn off Background color and turn on Header border.

Showing totals
Totals no longer appear automatically at the bottom of your quote. To show them, add a Quote total widget wherever you'd like totals to appear. You can set each Quote total to show the total for the current block or the whole page.
To add a Quote total:
- Hover below your Quote section and click the + (Add to quote) icon.
- Under Total, choose Quote total.
The Quote total appears below your section, showing the total of your line items.

Managing your Quote sections
To manage a whole Quote section, including all its line items, click anywhere on the section. A toolbar appears above it with options to style, duplicate, or delete the section.

Moving a Quote section
To move a section up or down, hover over the left edge of the section's header until the drag handle (⋮⋮) appears. Then click and drag the section to its new spot on the page.

Duplicating a Quote section
Duplicating a section is a great time-saver. Click the section's header to bring up the toolbar, then click the Duplicate icon. The copy appears directly below the original, with the same name and line items, ready for you to move and edit.

Deleting a Quote section
To delete an entire section, click the section, then click the Delete (trash can) icon in the toolbar.

Showing or hiding sections with rules
Note: The Rules widget is only available on the Scale plan, via the Smart Proposal Engine. Rules must be set up in a template, not on an individual page.
You can use the Rules widget to show or hide parts of your quote based on variables you set when creating a page.
To show or hide a whole section:
-
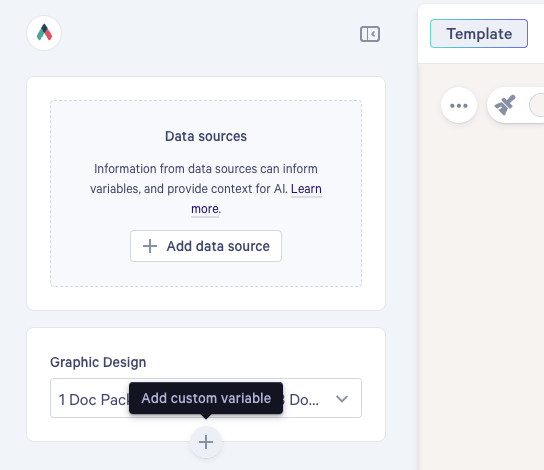
In your template, make sure you have a custom variable to base the rule on. To create one, click Add custom variable in the left panel.
-
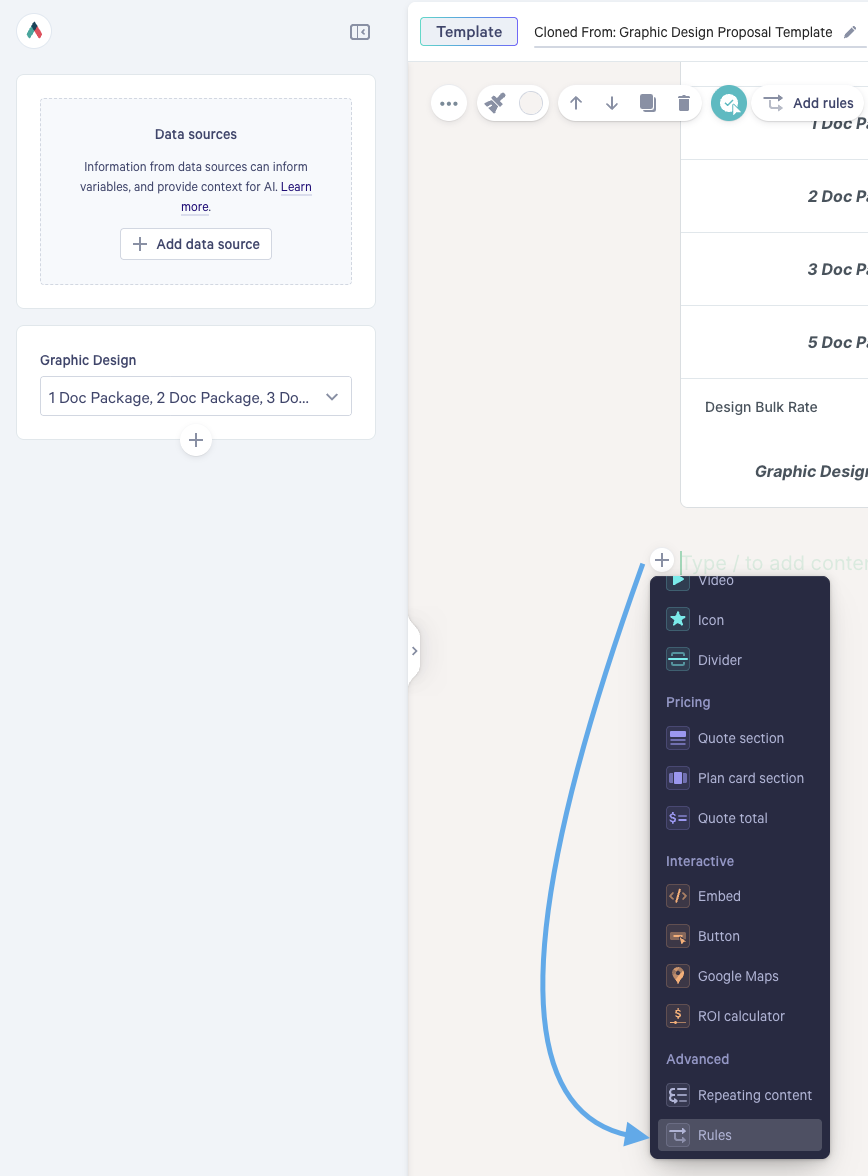
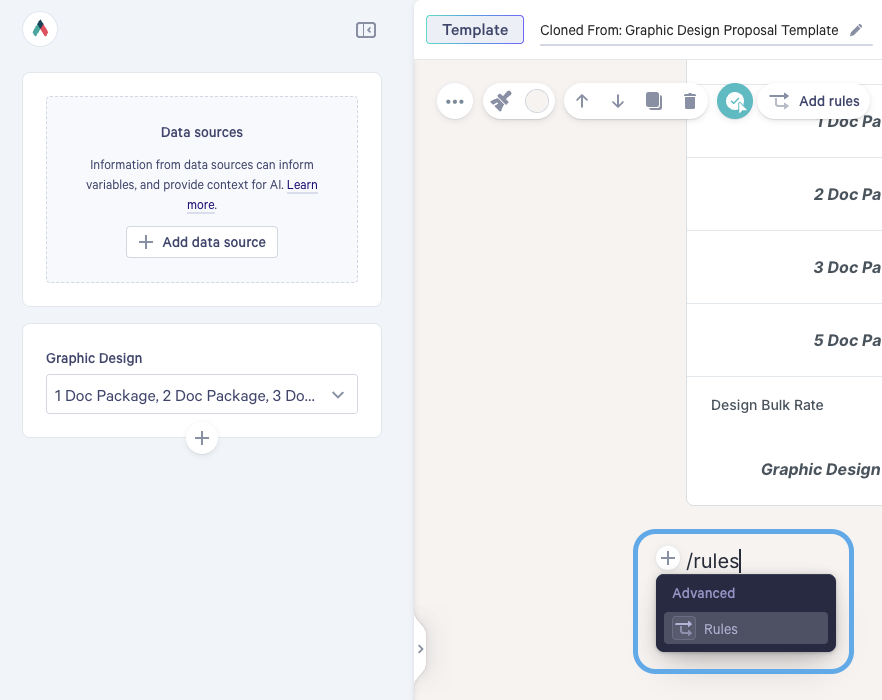
Click the + on a blank line in the Text block (or type /rules) and choose Rules.
-
Hover over the left edge of your Quote section's header until the drag handle (⋮⋮) appears. Drag the section into the empty space under Then show in the Rules widget.
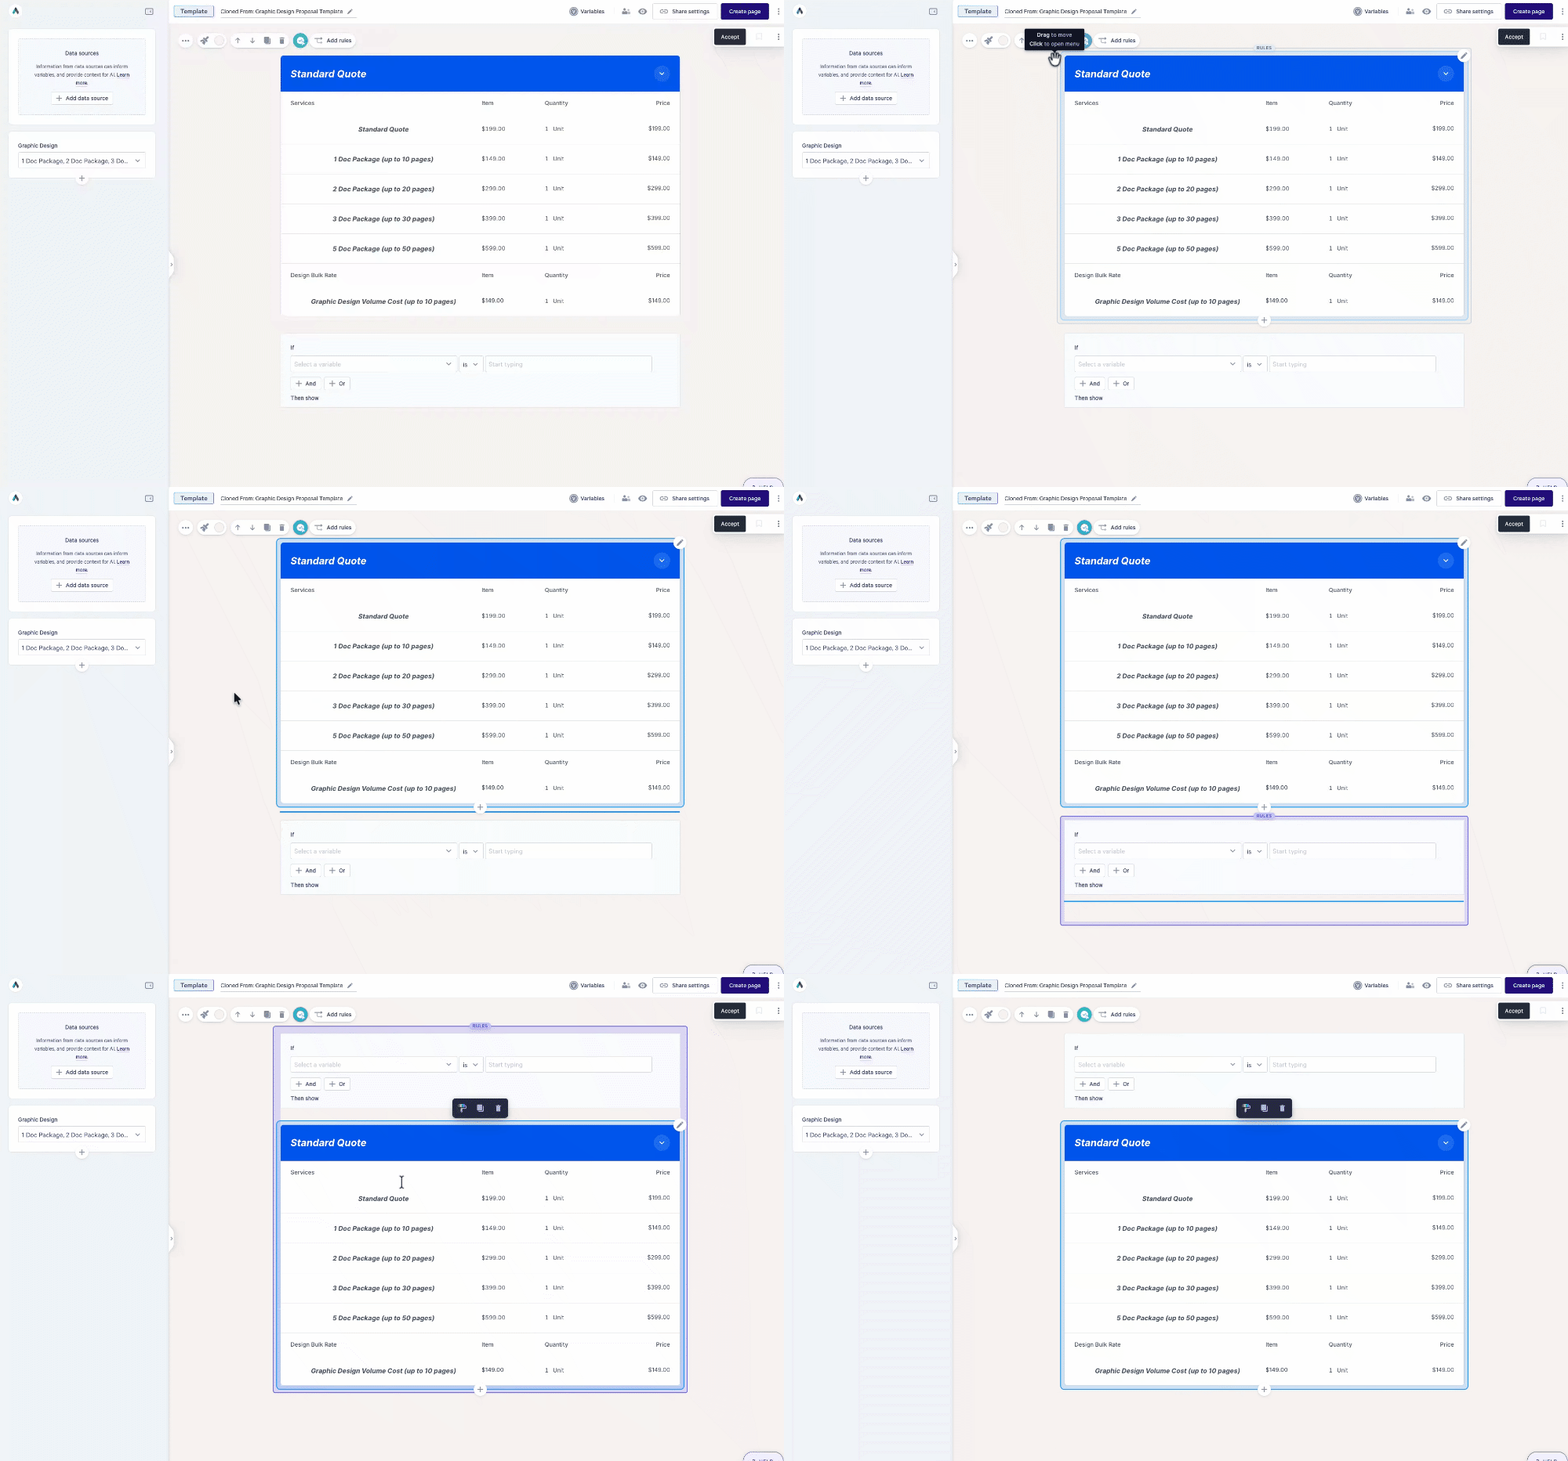
- Choose your variable and set your condition. For example: if Graphic Design includes 1 Doc Package.
-
Click Done.
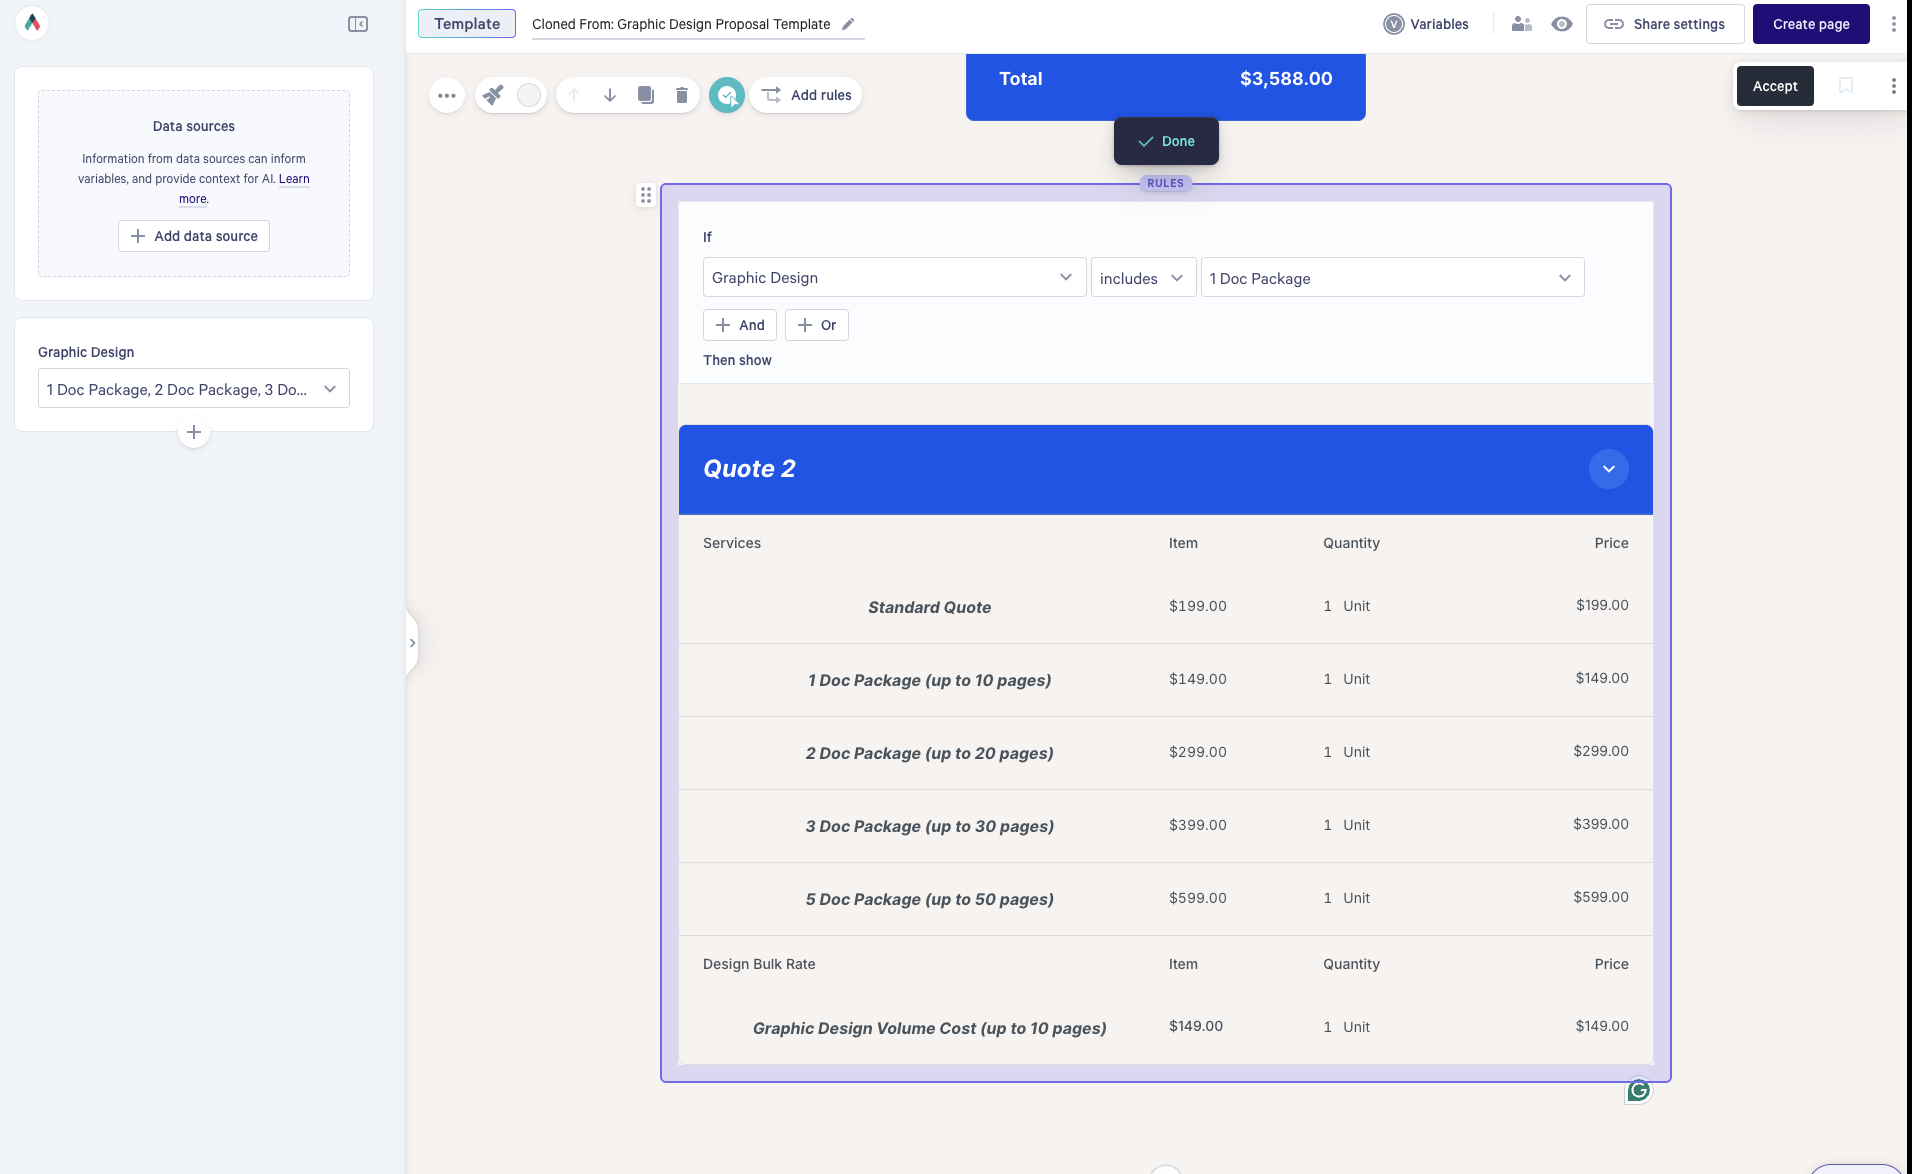
Note: You can also click into the empty space under Then show and add a new Quote section there.
To show or hide specific line items:
- Hover over the left edge between two line items and click the +. Choose Freeform content, then click the + or type /rules and choose Rules.
- Hover over the left edge of the line item you want to control until the drag handle (⋮⋮) appears. Drag it into the empty space under Then show.
- Choose your variable and set your condition. For example: if Graphic Design includes 2 Doc Package.
- Click Done.

Need help? Reach out to us at help@qwilr.com.