
Using the image library
Maximizing efficiency: let's save time with the image library!
Once you've uploaded some images to Qwilr, they'll be stored in your image library to use again. Here's how to make the best use of your image library.
In this article:
- Accessing your image library
- Renaming your uploaded images
- Searching your images
- Organizing your images into folders
- Sharing image folders
- Deleting images from your library
- Explore tab
Accessing your image library
There are two ways to access your image library, and you can use them interchangeably.
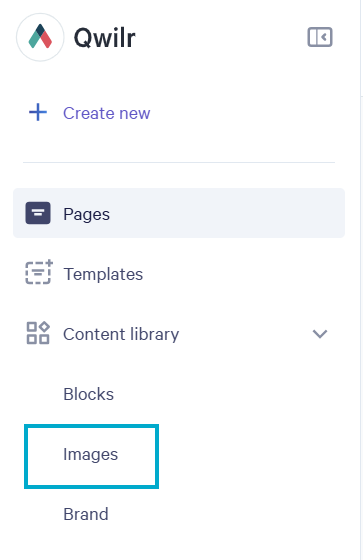
To get to the image library directly, on your Qwilr dashboard on the left you'll see your sidebar navigation with Content library, and under it, Images.
You can also open, or already be in, any page, navigate towards the middle of the left-hand side of your screen, and click the Library sidebar.

Alternatively, you can head to any page, click on the + symbol that appears on any blank line, and then choose Image.
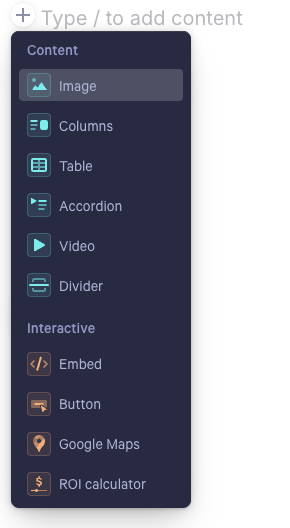
Either action will open your library in a sidebar. You'll find your saved blocks here as well as your images. Each section has a tab, so be sure to click on Images.

By default, you'll see a display of images you've already uploaded. But the image library has 3 folders:
- Pexels Collections: Qwilr contains a large stock image library from our partner Pexels, which you can use in your pages royalty-free.
- Recently Used: Images you've added to pages recently. This display will combine your uploads and stock images.
- Uploads: All images your team has uploaded to Qwilr Pages.
To access the other sections, click on Uploads to reveal those folders.

From certain areas of Qwilr, you'll access this full view of the image library. It has the same 3 folders.

Note: By default, Qwilr arranges your images according to when they were uploaded, with the most recent ones first.
Renaming your uploaded images
You can update the titles of the images you've uploaded at any time. This makes it easier for your team to search and locate images easily.
First, open any Qwilr Page for editing. In the middle of the left-hand side of your screen you will find the Library sidebar. Choose it, then click on the Images tab.
From there, click the Full Library icon to open an editable view of your image library.

Your image library will open in a pop-up window, and here you'll have access to rename or delete your image files.
To rename an image, hover over its thumbnail. The filename will appear in the top left corner. Click on that to change the name, and then click the check mark. The change will save automatically.

Note: A naming convention can help keep your team's images organized. If, for example, you always use "logo" in the names of logo images, your team will be able to search for "logo" and see them all.
Searching your images
The Uploads and Pexels folders of your image library have a search bar at the top, which you can use to locate images quickly. Type your query in the box, and all images with that word in their filename will appear.

Note: The search is folder-specific. If you're in the Uploads folder, the search results will be uploads. If you're in the Pexels folder, search results will be stock images.
Note: When searching your uploads, results include all images across the account that you have view access to, not just the folder you're currently in. Images in folders that haven't been shared with you won't appear in your search results.
If you're in the full library view, you'll see the same search bars.

Organizing your images into folders
While you're in the full library view, you can set up folders to organize your uploaded images. Then your team will be able to access these folders from the sidebar view.
To get started, open any Qwilr Page for editing. Navigate towards the middle of the left-hand side of your screen, and click the Library sidebar.
Next, click the Images tab, and then click the Full Library icon.

You'll now be in the full library view. Head to the left menu and click the Add Folder icon.

Give your new folder a title, and hit Enter to save it.

From there, you can drag images to the folder, either one at a time or in batches. To move a batch of images, click on the checkboxes to select them. Then drag them all to the folder.

Note: You can also use the search bar when in Full Library mode to narrow things down to the images you need. That can really help save time when you're setting up image folders.
Click on the 3 dots next to your folder's name, and you'll be able to share it, add a new nested folder, rename it, or delete it.

Note: Deleting an image folder will delete all images inside it, so be careful!
To get to your image folders from the sidebar view, click on Uploads to open the folder drawer, and then click on your folder.
Note: You'll only see the folders you have access to. If you're missing a folder you need, ask an admin (or someone with edit access to that folder) to share it with you.


Note: Qwilr supports JPEG, PNG, and GIF file types. The maximum file size to upload is 5MB.
Sharing image folders
You can control who can view and edit each folder in your image library. Folders can be shared with individual users or teams, with one of two access levels:
- Can edit - Can share the folder and manage all images within it
- Can view - Can view and use all images in the folder (for example, adding them to a page)
To share a folder:
- Open any Qwilr Page for editing and click the Library sidebar (middle of the left-hand side of your screen).
- Click the Images tab, then click the Full Library icon to open the full library view.
- In the left menu, find the folder you want to share.
- Click the three-dot menu (⋮) next to the folder name.
- Select Share folder.
- Type the name or email of the person or team you want to share it with.
- Use the dropdown to choose their access level (Can edit or Can view).
- Save your changes.

A few things to keep in mind:
- Images that aren't in a folder remain visible to everyone who has access to the image library.
- Admins can edit and share all folders by default and cannot be removed from access.
- Search respects your access. Search results only include images you have view access to.
For a full guide to how folder permissions work in Qwilr, see Folder Management & Permissions in Qwilr.
Deleting images from your library
You can delete images from your library at any time. When you delete an image, it will remain visible in all pages where you've already used it. You can always upload it again later if you need to.
To delete an image from the library, you'll need to be in the full library view. Click the Full Library icon in the sidebar to head there.

From there, hover over the thumbnail of the image you want to delete. A trash can icon will appear in the top right corner of the image. Click that to remove this image from your library.

Explore tab
The Explore tab is designed to help you quickly get started by providing easy access to a variety of content like Images, Blocks, and Videos. In the All sub-tab, you can easily find and browse through all available content in one place, making content creation even faster and more streamlined.

To add an Image, Block, or Video from the Explore tab to your proposal, simply drag and drop it into place:

Need to know more? Email us at help@qwilr.com.