
Adding and managing inline images
Images add great visual impact to your Qwilr Pages. You can add images as backgrounds or inline.
In this article:
- Adding an inline image
- Pasting an image
- Dragging and dropping an image
- Resizing an inline image
- Aligning an inline image
- Cropping an image
- Adding a circle frame to an image
- Removing an inline image
- Replacing an inline image
- Reducing spacing around images
- AI Image Generation
- Editing Images with AI
- Permissions and Availability for AI Images
- AI Image Common Questions
- Adding a Background image
- Organizing your uploaded images into folders (links out to another article)
Note: Qwilr supports JPEG, PNG, and GIF file types. The maximum file size to upload is 5MB.
Adding an inline image
You can add inline images to any block.
While this article discusses how to add inline images from within a Qwilr page or saved block, you can also add them by directly navigating to the Image Library on your dashboard under your Content library > images. For more on that, please review the help doc: Using the Image library.
For adding images while in a page editor, see the below
First, open any Page for editing, navigate towards the middle of the left-hand side of your screen, and click the Library sidebar.

Alternatively, while you're editing any page you can click on the + symbol from any blank line, and then choose Image.

Either action will open your image library in a sidebar display.
When you select Image from the widget selector, you'll also have three options for adding a photo:
Upload – Upload images directly from your device.
Library – Access images that have already been uploaded to your account.
Explore – Browse through a selection of images available in our collection.

In your Library, you'll find your saved blocks as well as your images. Each section has a tab, so be sure to click on Images.

By default, you'll see a display of images you've already uploaded. To access the other folders in your image library, click on Uploads.

From there, you can choose an image from our Pexels stock library, or grab an image you've recently used. When you find the image you want, you'll be able to click and drag it into your page.

Pasting an image
This method works for adding inline images. It's also handy for moving an image from one location to another.
Step 1. On your computer, locate the image you want to add to your page. Right-click on the image and choose Copy.
Step 2. Head to your Qwilr Page. In any block, place your cursor where you want the image to appear. You should see a + symbol appear next to the cursor.
Step 3. Right-click and choose Paste. Your image will upload automatically.

Dragging and dropping an image
This method works for adding inline images. It's also a good option for adding multiple images at once.
Step 1. On your computer, locate the image you want to add to the page.
Step 2. Head to your Qwilr Page. In any block, place your cursor where you want the image to appear. You should see a + symbol appear next to the cursor.
Step 3. Drag the image file to your Qwilr Page and drop it. It will upload in the location you selected.

Resizing an inline image
To resize an image, click on it to bring up the blue handles at the corners. Click and drag any of them.

You can also utilize our wide and full bleed options beyond inline content. This way your image can be wider than the text, or fill the page left-to-right.

Aligning an inline image
You'll be able to align your image to the left or center. Click on your image so the toolbar pops up, and then choose your alignment.

Cropping an image
To crop images, select the image and click the “Crop” button in the top toolbar. This opens an extended crop mode in which you can adjust the image by dragging the selection box or choosing from a list of common aspect ratios. It’s a quick and flexible way to fine-tune how your images appear within your page.


Adding a circle frame to an image
Some images look best as circles. You can change any inline image to a circle by clicking on it to bring up the styling toolbar. Then choose Circle Frame from the image frame menu.
If you need to reposition the image in the circle, click Reposition in Frame. You can then click and drag the image itself, and drag the slider to change its size.
After that, you can click and drag the corners to resize the new circle image.

Removing an inline image
To delete an inline image, click on it to bring up the toolbar. Then click on the trash can icon.

The image file stays in your image library, so you can use it again in the future.
Replacing an inline image
To replace image, first, click on the existing image to bring up the toolbar. From there, click on the Swap Image icon. That will take you to the Image Library.

You can use the folders in the left sidebar to choose a new image from our stock library, grab one of your recently-used images, or use one that you've already uploaded.

If you want to upload a new image, head to the top right corner and click the Upload button.

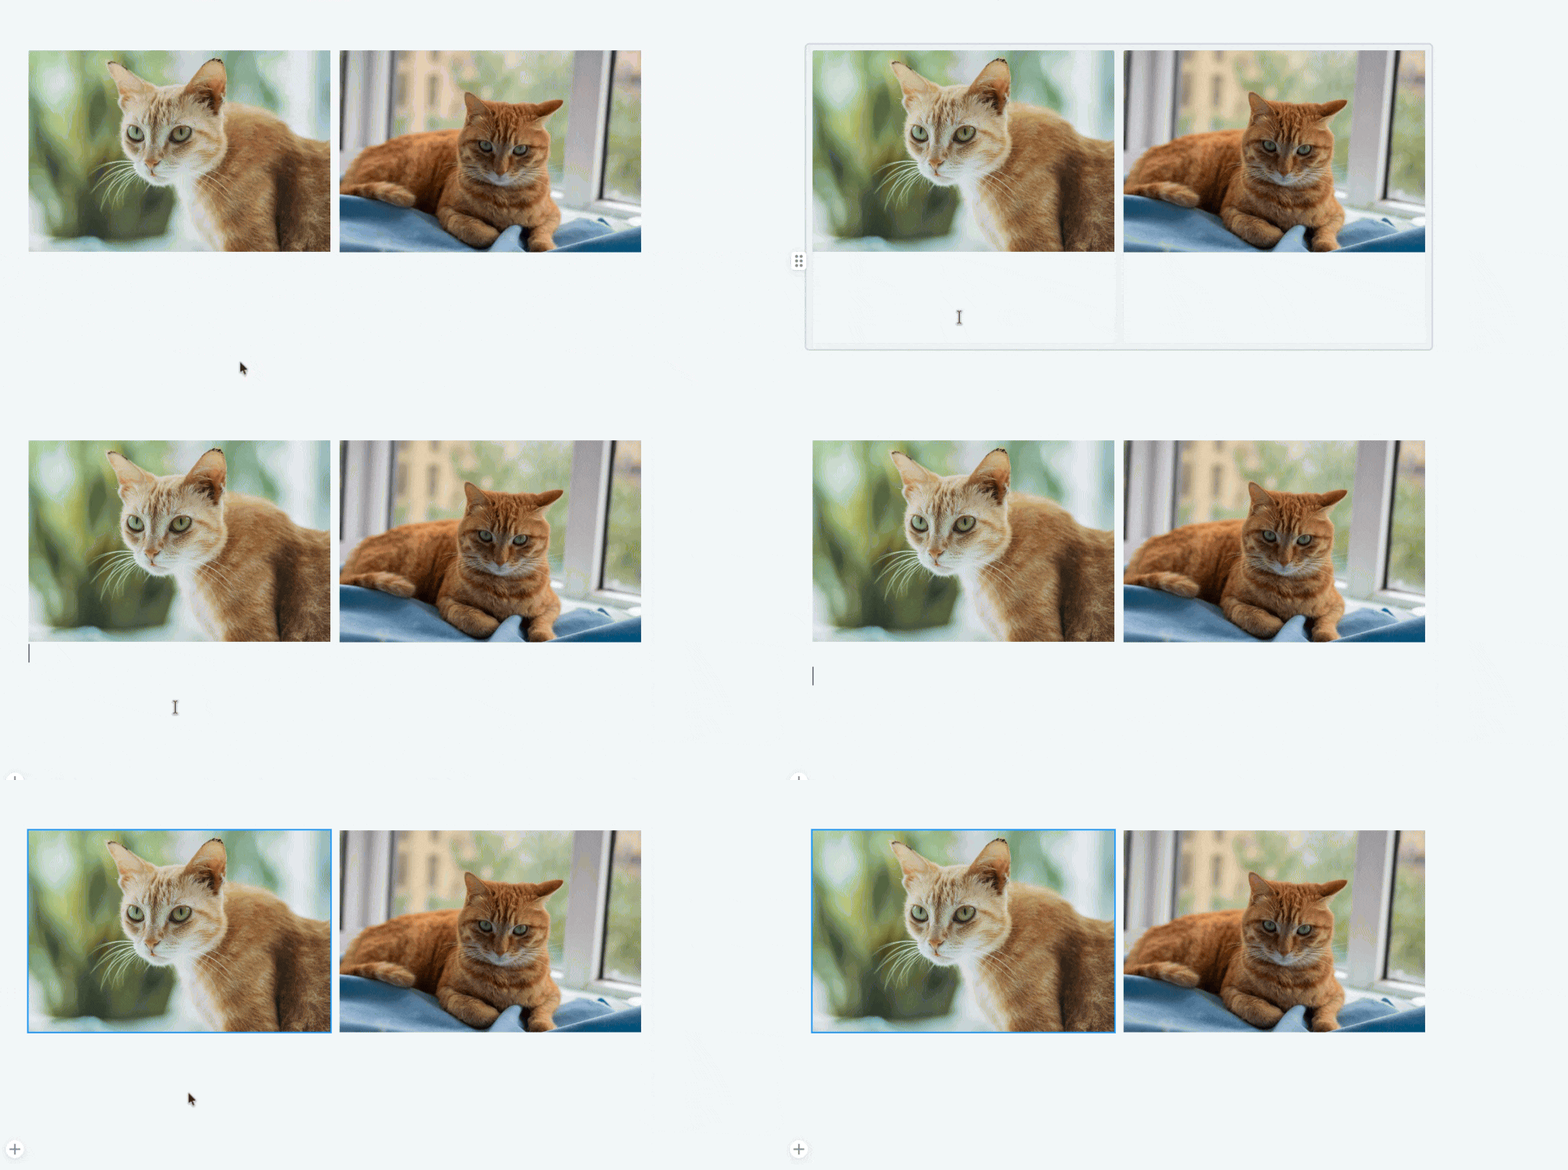
Reducing spacing around images
If you're seeing more space than expected above or below an image, there are two things to check.
First, look for blank lines adjacent to the image. Click on any empty line near the image, then press Backspace to remove it.
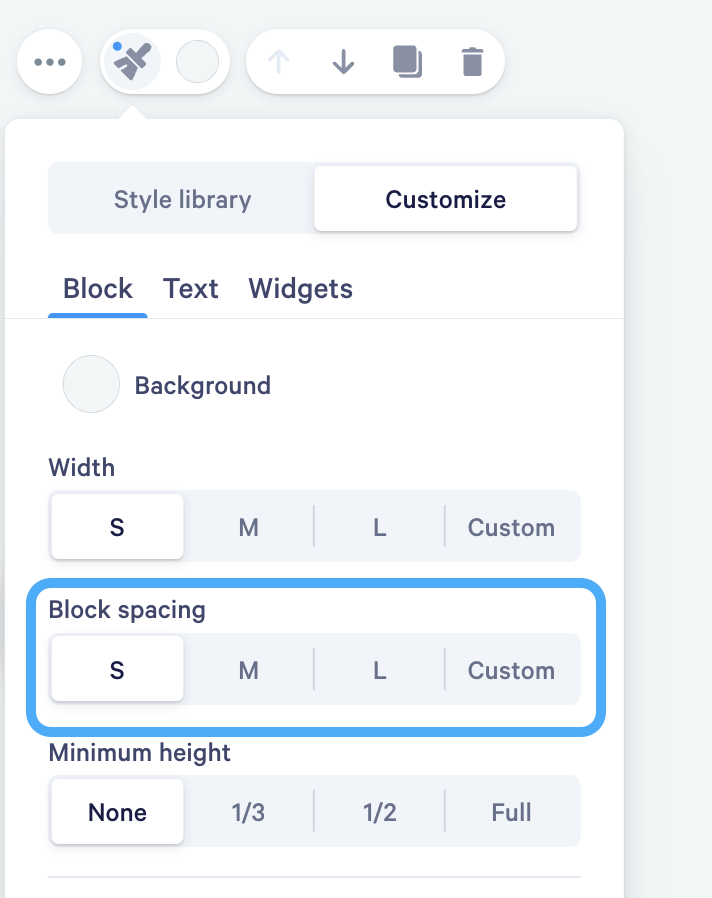
Second, reduce the block's built-in padding using the Block Spacing setting. Click the paint roller (Style Library) icon in the top-left corner of the block, choose Customize, then find the Block Spacing option. Setting it to S minimises the padding at the top and bottom of the block, which will close up the space around your image.
AI Image Generation
Qwilr allows you to utilize AI Image generation and editing to create and edit images in your proposals with generative AI. This lets you create images directly in the proposal, edit them, and they are stored for future use in your image library.
Generating an AI Image starts the same as adding an image from your library or uploading a new image to Qwilr. In your page, click on the '+' symbol within a block to add a new image to your proposal.

A box will appear with a few options like Explore for browsing the stock image library, Library for adding in your existing images, Upload to add a new image, and Generate to create a new image via AI.

Clicking on Generate will open up a prompt window to Describe the image you want to create. You'll want to be specific here describing the subject, setting, and mood as well as mentioning things like colors, lighting, and composition to get a more detailed image tuned to what you need. There is also the dropdown for styles, including Realistic, Illustration, Watercolor, and 3D render.

After entering in your prompt you will see a generating window screen while the AI takes a few moments to generate the image. Then, the image will generate. In the example image below we have the following prompt with the style set to Realistic.
"Two construction works outside of a home remodel smiling and looking directly at the camera during a sunny spring day. One of them has a to go coffee cup in hand."

This image is automatically added to your image library for use with other Qwilr pages as needed. Now let's talk about editing the image via AI.
Editing images with AI
Whether working with an image that was AI generated in the Qwilr proposal, adding existing images from your image library, or uploading a saved image from your computer you can edit those images with AI right in Qwilr.
Continuing with our above image example of the construction workers, click on the image to bring up the context menu and you will see an icon Edit with AI.

Once you've clicked that icon, you'll see a new prompt box asking What do you want to change? Here we want to describe the specific change we want to make, not the whole image. We want to name what needs to be changed and what it should become. For best results, limit changes to one concept at a time though you can enter multiple instructions. You'll also notice we have a Remove background button and a Boost resolution button to trigger those simple actions if that is all you need to accomplish.

For the change on the construction worker image, we've used this prompt:
"Change the shirt color to a dark brown for the man standing on the right."
This image will then have a rolling 'scan' effect as it processes this request. If the prompt was entered by accident or triggered before you were done writing you it you click the Stop icon at the top of the image while process. Don't worry, however, as every version of the image is saved to your image library if you have to go back to a previous one. Below is the result of our change.

I could click on the image again and select the Edit with AI option to make further changes. Like the original generated image, this edit is saved in the image library for further use.
AI Image Permissions and Availability
All Qwilr accounts have access to AI image generation. Different plans have credits included in their subscriptions. Below is a table describing the amount included per account type. Trial accounts get 10 image credits included during their 14-day free trail.
| Plan | Monthly | Annual |
|---|---|---|
| Starter | 10 | 150 |
| Growth | Not Available | 1000 |
| Scale | Not Available | 3000 |
Legacy plans (Business & Enterprise) will have 10 image credits included until they upgrade to a modern plan type.
Admins in Qwilr can navigation to Account settings and then Usage & Credits to find their current Content created with AI count. See the screenshot below.

If you need more AI images that are included in your subscription, Admins on your team can purchase one of the following bundles:
- 2000 image credits for $100 USD
- 5000 image credits for $250 USD
- 10000 image credits at $500 USD
Permissions for Creators to use AI image generation and editing can be set by going to Account settings and Account and scrolling to the bottom. Here you can toggle on the general AI features for the account and whether you Allow creators to generate and edit images with AI.

Common Questions for AI Image Generation
Why can't I generate AI Images on my account?
There are a couple reasons this could be the case. The permissions for AI features or Image generation are turned off specifically under Account settings > Accounts beneath the Feature Permissions section. You also may be on a legacy account type like Business or Enterprise so are out of credits and cannot purchase more. In that case, contact help@qwilr.com to ask about upgrading your account.
How are my credits used with AI Image creation and editing?
- If a user prompts to generate an AI Image and the image is created, this will consume a credit.
- If a user prompts to generate or edit an AI image and then decides to stop it, we still consume a credit as the AI has initialized and the task is working until stopped.
- We do NOT consume a credit if you receive any sort of error on image generation or editing with AI.
What happens when I run out of credits for AI Images?
You will see a notice that there are No images remaining. In the case of a trial account, you can pick a plan to purchase. On paid accounts a Qwilr Admin can purchase one of our image bundles; Creator users will have to reach out to their account admin to get more credits added to the account.
Do unused credits carry over?
No. Unused credits do not roll over on your next billing period. This is why our our bundles do not scale with increased spend, so you can purchase the credits you need.
Does Qwilr store customer prompt data?
Qwilr automatically sets the title of an AI generated or edited image as the prompt used to create it. This appears in the Image Library. However, Qwilr does not store that data in analytics and if the images are retitled in the image library, that data is not recoverable.
Adding a Background Image
You can upload an image to use in a Block at any time - during the initial creation of the block or when you update it later.
Step 1. Add any new Block and it'll automatically select a random image from the library.
Step 2. Choose an image of your choice from the menu to change the image on the Block.
Step 3. You'll then be prompted to either select an image from the library, upload one or drag and drop from your files.

Tint Opacity & Background Blur
To adjust the Tint Opacity and Background Blur, go to the Background settings, select Image, and scroll down to Tint Opacity. Use the Tint Opacity slider to control the transparency of the tint over the background image and then scroll down to Background Blur slider to soften or sharpen the background details.

Tint Opacity
This controls the transparency of the background tint applied to the background image. Increasing the opacity makes the tint more visible and dominant, while lowering it makes it more transparent, allowing more of the background image to show through.
Background Blur
This adjusts the level of blur applied to the background image. Increasing the blur softens the details of the image, making it less distracting and improving text readability if text is overlaid on top. A value of 0 means no blur is applied.
Note: Learn more about file sizes and resolution for Background images here.
Learn more:
Questions? Contact us at help@qwilr.com.