
Salesforce: User Guide
In this guide, we'll show you how to use Salesforce with Qwilr to make personalized documents in seconds.
Note: This integration is only available to Scale (and legacy Enterprise) plan customers.
To follow this guide, you'll need to have installed the integration and created a template already.
In this article:
- Integration overview
- Connecting to your Qwilr account
- Creating your first Qwilr Page
- Available options within the Qwilr widget
- Viewing the page activity feed
-
Integration overview
The Qwilr Salesforce integration lets your team create personalized Qwilr Pages from your Opportunity, Contact, Account, and Lead records. This video gives you a quick primer on the integration.
Connecting to your Qwilr account
After the installation process, each user in your Salesforce account will need to link Qwilr to Salesforce.
Note: Your Qwilr account email address and Salesforce account email address must match for this connection to work.
Open an Account, Lead, Contact, or Opportunity record in Salesforce. (The type of record you use depends on where your admin set up the integration.) Click the Details tab. You'll see a Connect Now button. Click that, and we'll match your Salesforce and Qwilr email IDs and enable your account.

Note: If you are inviting users into your Qwilr account, you need to use their actual registered email address in Salesforce. It's possible that they use a different username to log into Salesforce - if so, make sure to match the email address, not the username.
Creating your first Qwilr Page
Step 1. Make sure you have a Salesforce template created.
Step 2. Head to the record you'd like to create a page from. Locate the Qwilr widget in the Details tab.

Step 3. Once you're at the Qwilr widget, click Create New.

Step 4. Select the template you want to use, and click Use Template.

Step 5. Success! You've created a Qwilr Page. You'll now see a mini dashboard for that page in the Qwilr widget. You'll be able to see the current page status here, as well as the total number of views it has.

Note: Pages you create from within Salesforce will default to a Live status, so they're ready to share with your buyer.
Available options in the Qwilr widget
You can use the mini dashboard for your page to access a number of useful tools.
Preview
Clicking the Preview icon lets you see the public version of the Qwilr Page that your client sees.

Edit
If you click the Edit icon, the page opens in Qwilr so you can make changes. Qwilr saves your changes automatically and you can see them in the page preview right away.

Tip: In your Qwilr account, set page Default sharing to "Edit by everyone" so that other creators from your Team can edit each other's work. To do this go to Account Settings and scroll down to Default sharing.

Share
Clicking on the Share icon copies the link to the public version of your Qwilr page. Then you can paste that link into an email, instant message, text, or any other form of communication you use with your client.

View Analytics
When you click View Analytics, you're taken to Qwilr to see the analytics for this page. You'll be able to see the date, time, location, and duration of each view. You'll also see which blocks of the page your clients are spending the most time in.

Delete
You can delete any page that hasn't been accepted yet. When you click Delete, the page will be removed from the Qwilr widget and from your Qwilr account. You can learn more about deleted pages here.

Download as PDF
Clicking Download as PDF will save a PDF of the page to your computer. If you need to change the page size, format, or add page numbers to the PDF, please see this article.

Note: This integration stores two versions of the PDF in the Notes and Attachments* section of your Salesforce record. When you create the page, a PDF copy is stored. When your client accepts the page, a signed PDF copy will upload as well.
*If your Salesforce account was created after Salesforce transitioned from 'Notes and Attachments' to 'Files,' accepted pages will no longer upload automatically.
Download CSV
At the top of the Qwilr widget, you'll see a button that downloads a CSV file. The file will contain the names, current status, and URLs of all of the Qwilr pages you've created from this Salesforce record.

Viewing the page activity feed
You can see all of the activity for this page in the Activity tab of your Salesforce record. This activity feed includes the first view of the document and when it's accepted.

Viewing your pages in Qwilr
For any template, you can also choose a default page output folder by selecting More actions (the three dots). Whenever you create a new page, it will automatically appear in the selected output folder.
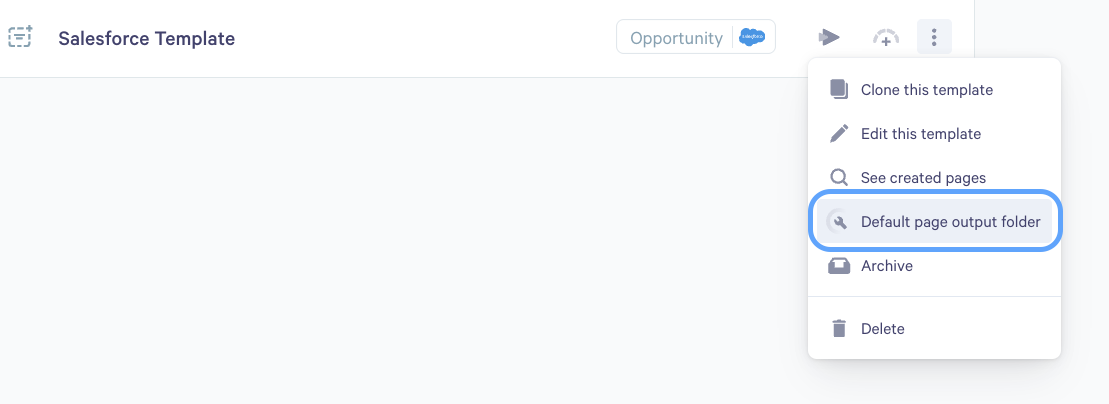
If there is no default output folder for a template, all pages created from this template will be saved in the Pages folder.
More Salesforce details:
- Setting up the Integration
- Creating Templates
- Creating and Managing Pages
- Automating Quotes with Pricebooks
- Creating workflows with Salesforce Flows