
Zoho: Setup and Create
If you use Zoho CRM, you can build a personalized Qwilr Page that pulls in details from any record.
In this article:
- Installation for paid Zoho accounts
- Installation for free Zoho accounts
- Creating a Template
- Adding Zoho CRM Variable
-
You can use Qwilr + Zoho CRM flexibly, depending on your Zoho account.
- Free Zoho accounts: You'll be able to connect the integration from within your Qwilr account, and create new pages from within Qwilr.
- Paid Zoho accounts: You'll be able to install the Qwilr extension from the Zoho Marketplace. Then you'll be able to create pages from either your Zoho CRM records or Qwilr.
Note: To connect the integration, you'll need admin access to Qwilr and Super Admin access to Zoho CRM.
You will also want to make sure your users have Zoho CRM API Access turned on under Extension Permissions > CRM API in Zoho. More info on that here.
You can use this integration with any type of Zoho CRM record: Lead, Contact, Account, Deal, or Quote. Each Qwilr template you create can connect to one of these record types.
Installation for paid Zoho accounts
If you have a paid Zoho CRM account, use these steps.
Step 1. Log into your Zoho CRM account, and your Qwilr account. Then head to the Zoho Marketplace.
Step 2. Search for the Qwilr app. Then click the Install button.
Step 3. You'll be prompted to agree to terms and conditions. Then click Continue.
Step 4. Choose the Install for all users option. Then click Confirm.

That's it! The app is now installed. Head to any Lead, Account, Deal, Contact, or Quote record, and you'll now see a Create Qwilr Page button at the top right corner.

Don't see the "Create Qwilr Page" button?
It's possible that you have a custom button in Zoho that is overriding the Qwilr button. In that case, simply click the dropdown arrow or the three dots menu, and check if "Create Qwilr Page" is listed there.

Installation for free Zoho accounts
If you have a free Zoho account, use these steps to get set up.
Step 1. Make sure you're logged into your Zoho CRM account. Then in Qwilr, head to the top right corner and click on your initials. Choose Add Integrations.

Step 2. Choose the Zoho CRM option. Then click Enable Zoho CRM.

Step 3. Follow the prompts to connect, and that's it! Now it's time to create a Qwilr template.
Creating a Template
Step 1. To get started, go to your Template Library and click Create blank template.


Note: Maybe you already have a Qwilr page you've created that you want to see as a template. After you create a Qwilr Page, while editing it, you can head to the top right corner and click the Convert to Template icon.

Step 2. It's time to connect this template to Zoho CRM. In the top right corner of the template, you'll now see a Variables icon. Click that.

Step 3. A Variable menu will appear. It has two tabs. Click on the CRM tab, and then click Add to CRM.

Step 4. Enable the Use in Zoho CRM switch, and then choose which type of Zoho CRM record you plan to work with: Leads, Accounts, Contacts, Deals, or Quotes. Click Confirm to save.

Note: In Zoho CRM, you can change the name of an object, like renaming "Deals" as "Opportunities." However, Qwilr will only display the default object names.
Adding Zoho CRM Variables
Now that you've converted the template, it's time to add some Variables. Variables will pull in information from your Zoho CRM record.
If you're still working on your template, the Variables list should still be open, but now displaying a list of available Zoho CRM Variables.
Note: this integration also supports custom fields in Zoho CRM. Click here to learn how to set up custom Variables.

Note: The Account tab is for account Variables. If you're using the Zoho integration, you can use account Variables and Zoho Variables together in the same template — just make sure to use the Zoho tab for your CRM-specific Variable.
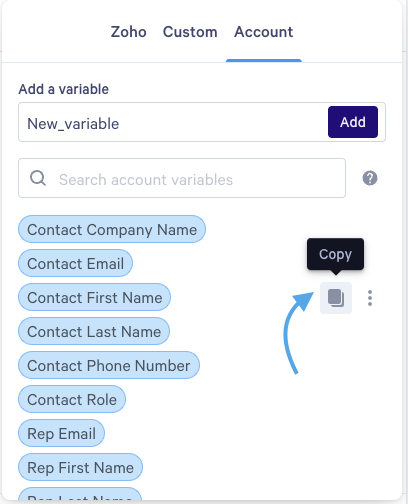
3 ways to place Variables in your template
Method 1: To copy a Variable, hover over it to bring up the Copy icon next to its name, then click on that. Then place your cursor in the template where you want the Variable to be. Use your keyboard command of Ctrl-V or Cmd-V to paste it.
Method 2: Alternatively, you can click on any Variable in the list, and drag it to the location in your template.
Method 3: As a quicker option, place your cursor where you want the Variable to go. Then type two curly brackets, like this: {{ . That will bring up your Variable list in that spot, and you can choose the Variable you need.
Variables in your Title: Using the same method as above, in the title of your Template at the top-left corner, you can also type this: {{ to open up you Variable list and enter a Variable in your title.

Note: Automations based on accepting pages are not available for this CRM, as we do not have the ability to draw a specific record ID from the CRM into the Qwilr page it was generated from.
Styling a Variable
Click on any Variable, and you can add bolding or italics to the information that pulls in from Zoho CRM.

Removing a Variable
Click on any Variable, and you can remove it from the template. Click on the trash can icon.

Creating Qwilr Pages
Your template is ready! Now you can use it to create a personalized page.
Step 1. In Zoho CRM, head to a record that matches how your template was converted. If you created a Deal template, for example, you'll only be able to use it from Deal records.
Step 2. In the top right corner of the record, click the Create Qwilr Page button.
Step 3. A pop-up will appear, where you can choose your Zoho template. If you have multiple templates, you can search by title to find the one you need.

Step 4. From there, you'll see a second pop-up appear. You can give your page a unique title, and choose a folder where the page will be stored.
You'll also be able to verify that all of the Variables in your template were able to pull in data from Zoho CRM.

If there's no information in a particular Zoho CRM field, you'll see a warning message that says:
Empty Variable. We couldn't find data for X Variable. It'll be blank when you create your Page. Don't worry, you can always hop in and edit your page after it's been created.
Missing variable:
variable_name
You can either head back to Zoho CRM and fill in the field, or proceed with creating the page and add that information afterward.
Step 5. Click the Create Page button. Now you'll see several options:
- You can set the page Live and then copy the public link to share with your client.
- If you'd rather send the page to your internal team for review, you can copy the Collaborator link.
- If you want to keep editing the page, you can click through to the Qwilr editor and keep making changes. (If you choose this option, you'll still be able to get the public link and Collaborator link later.)
To exit this pop-up, head to the top right corner and click Close.

See Your Qwilr Pages in Zoho
You'll see a new list attached to the sidebar of the Zoho CRM record. It shows all pages that were created from this record, along with important details.
You can grab the public, Collaborator, and PDF links from here. You'll also be able to see the number of views the page has had, and the status change when your client accepts the page.

You'll also find the page on your Qwilr dashboard, where you can get the same links and status updates.
Have any questions? Write to us at help@qwilr.com.