
Creating a Qwilr Page from Scratch
Ready to build a Qwilr Page that wows? Whether it’s a proposal, pitch, or portfolio, here’s how to create a fully customized, on-brand page from scratch effortlessly.
Want to start from scratch? Go for it! A blank canvas lets you craft a fully custom Qwilr Page, block by block.
But here’s the best part, you don’t have to start from zero! Choose from 100+ stunning templates to kickstart your page, or let our Digital Design Team transform your existing sales deck into a Qwilr masterpiece. Just drop us a line at help@qwilr.com to make it happen.
Feeling creative? Read on to DIY your perfect page.
In this article:
- Starting with a blank Page
- Adding blocks
- Adding content to Blocks
- Inserting visuals
- Adding styling
- Adding background
- Previewing your Qwilr Page
Starting with a blank Page
A new Qwilr Page starts from your dashboard. Click the Create New button in the top right corner. Then choose Blank Page.

Note: Choose From Template to start with one of our premade templates.
Adding Blocks
Qwilr Pages are made up of content sections called Blocks. Different types of Blocks do different jobs on your page.
To add a Block, click the + icon. You'll see these at the top and bottom of each Block on your page. You can add a new Block in any location where you see this symbol. You can choose from six types of Blocks.

Each type of Block has a different job:
- Text Block: Contains words, inline images, tables, maps, buttons, and more.
- Splash Block: For beautiful background images and videos.
- Video Block: For embedding videos from YouTube, Vimeo, Wistia, Loom, Vidyard and Brightcove.
- Embed Block: Allows you to embed content from other sources, like Google Maps, Typeforms, slide presentations, and calendars.
- Quote Block: Displays price quotes, which can be interactive and contain plans and packages.
- Accept Block: Displays an Accept button, and can include e-Sign and payment options.
When you're ready to add the next Block to your page, click on any of the + symbols you see between blocks. You can use as many (or as few) Blocks as you like in your Qwilr Page. Only the Accept Block has a limit of one Accept Block per Qwilr Page.

You'll find these Block Options in every block:
- Save the block to your saved blocks library.
- Move the block up or down the page.
- Delete the block.
- Clone the Block
- Make the block foldable.
- Add the block to your page navigation.
Adding content to Blocks
In most types of Blocks, you will see a placeholder where you can start typing. Click on it and begin entering your text.

Once you have some text in the Block, you'll be able to add formatting. Highlight any text, and an editing toolbar will automatically pop up.

Learn more about the formatting options here.
Inserting visuals
One of the great things about web-based documents is how many different kinds of visual content you can add. Qwilr provides an insertion icon to help you do just that. This icon is visible in all blank lines on your page and is represented by a plus symbol.
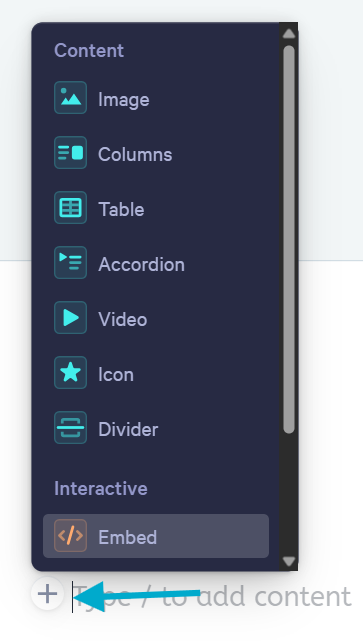
There's a lot you can do from this menu, including:
- Add an Image or a Video
- Add a Table to format lists of information
- Insert a Columns to set text, images, and other content side by side
- Add an Accordion to expand and contract content on the page
- Add an Embed Widget to iframe content from the web directly into your blocks
- Add a clickable Button
- Embed a Google Map
- Insert an ROI Calculator
Adding styling
Anywhere you see a paint brush icon, that's where you can change colors, alignments, and other styles.

You'll see this icon in the top left corner of every block and a other locations. Learn more about styling here.
Adding background

To make customizing your proposals smoother and more appealing, you can add color, image, or video backgrounds to any block (except the Quote and Accept blocks). This provides greater flexibility in your design. The background settings are accessible via a dedicated menu allowing you to quickly apply and switch between image or video backgrounds.

Here’s an explanation for each option:
- Background type: Choose between a solid color, an image, or a video as your background.
- Background tint: Add a semi-transparent layer over the background to improve readability.
- Tint style: Select "Normal" for a standard overlay or "Blend" for a smoother integration with the background.
- Tint opacity: Adjust the transparency of the tint using the slider (0 for none, 100 for full coverage).
- Background blur: This allows you to apply a blur to image or video backgrounds for better readability on the content in front of them.
- Background card: Toggle this on to add a separate background behind text for better contrast.
How do I change the image/video?
Background Images can be updated by clicking on the background image icon next to the style brush in the top left. There you can choose to click and drag an existing image from your library or the Pexels stock image collection onto the Background Box. You can also click the Upload button in the Background Box to upload images from your computer (PNG/JPG/GIF files only please).

Background Videos can be updated by clicking on the same icon next to the style brush in the top left. The library will open automatically with a limited amount of background stock videos or you can embed a background video by clicking on the Embed video icon in the Background Box. You can only embed videos from YouTube and Vimeo.
Note: You cannot upload videos directly to Qwilr. Only PNGs, JPGs, and GIF files.
Previewing your Qwilr Page
You can preview your Qwilr Page any time. While you're editing, head to the top right corner and click the Preview icon.

What's next?
From here, you can do even more with your page.
- Add a price quote
- Set up an e-signature
- Turn this page into a template, so you can use it again and again
Have any questions? Reach out to our team at help@qwilr.com - we're glad to help!